ArmA 2 Weighting Tutorial
ArmA 2 Forum, ArmA 2 Home, ArmA 2 Config, ArmA 2 File Formats, ArmA 2 Missions, ArmA 2 3D Modeling, ArmA 2 Scripting, ArmA 2 Terrain, ArmA 2 Texturing, ArmA 2 Tools
Firstly, this isn't really a tutorial as much as an overview of weighting, what it is, how to “do” it and ways of checking your work. Unfortunately there isn't really a speedy way to do manual weighting (although I'm sure a clever person has/could come up with some script for O2) and a lot of it can be trial and error but if have a bit of patience you can get the results you want. All the info below is stuff that I have learnt myself so it may well be wrong in places, its just my understanding of the subject. If anyone finds any inaccuracies, post and I'll get round to changing it.
Ok well, lets really start with the basics…
If you have ever clicked on a selection for an infantry model in O2 then you've probably seen lots of points light up in various red, blue and purple tones. To put it most simply, these colors refer to the “weight” each point has for a certain selection such as “LeftArm” or “Head”. As you can probably guess, each of these selections dictates how your model will animate in game. So as an example, what ever you define under the “Head” selection will move when the model's head turns up, down, left and right.
Now lets say you create a new ammo pouch model for your infantry, obviously you are going want it to move/animate like the other ammo pouches round it. So, we are going to have to add it to a selection. Now you could select say, “Spine1” and then all of your new pouch and add it to the “Spine1” selection but you will probably find that if you had a quick test of that it would still move differently in game. Thats probably because it is still weighted differently even if it is defined to the same “Spine1” selection. So lets get down to weighting it, while we are at it, lets find a faster way of testing whether the weighting is better. Loading up the game takes too long…
Right then, so where do we find the weighting tool?
Select “Edit” from the drop down tabs at the top of O2, under that at the bottom there should be an option called “Edit Modes” and under that should be an option called “Paint Vertices”. If you click that it will bring up a new little window which we will get to in a second. To get out of the “Paint Vertices” mode, you can enter one of the more common edit modes such as “Select Vertices” (shortcut V) or “Select Object” (Shortcut O). While we are on the topic of shortcuts, it is probably worth your while adding the “Paint Vertices” to a keyboard shortcut if it isn't designated to one already. You can do this by selecting “File” in the top left of O2 and then clicking on “ShortCuts”. From there you can add it to whatever you prefer. Mine is added to “1” on the keyboard.
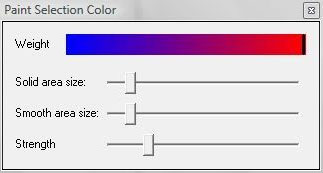
Anyway, I think its time for pictures. That little window that appeared when you select “Paint Vertices” has a couple different sliders on it each with a slightly different purpose. I'll go through each below.
Weight: I guess the most important one, this changes how much the vertices you paint are affected by the selection you add them to. The more red the color the more heavily affected the points will be. And the more blue the color, the less affected points will be by the selection they are added to. As a practical example, if I added something to the “LeftArm” selection with all the points being red, then in game they will move much more when the arm goes up or down. If those points were blue, then they would move far less as the arm goes up and down.
Solid Area Size: As you will see, your cursor will have changed to a circle, sliding this option to the left makes the circle smaller and sliding to the right makes it bigger. Basically changing the size of the area that you will “paint”. When you left click, the area inside the circle will be “painted” and have a weight applied to it.
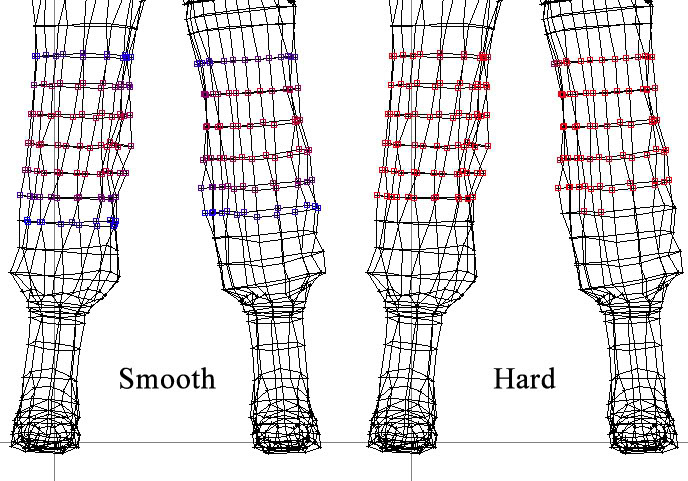
Smooth Area Size: This adds a second circle outside of the first one, using this will add an area that gets weighted less than the area inside the first circle. It creates a gradually decreasing weighted effect. This can be useful for areas like arms and legs where one part is heavily defined by a selection and the area around it is less affected by it.
As you can see on the picture, the left side has had the Smooth Area Size slider over to the right which has meant the outer points are less heavily weighted. The picture on the right has not used the Smooth Area Size at all.
Strength: This basically determines how strongly your selected color is applied to the points you paint. It affects blue, lesser weighted points, more subtly. If you selected a very bright red but had a low strength (left is low, right is high) then the color that will be painted onto your points will probably be a purple color first time, you will have to click a couple more times to get closer to the red you originally selected. This can be good if you slowly want to increase a weight to see how it affects an area.
Well lets look at actually using that shall we?
Depending on what you are weighting, there are a few ways of doing things. Lets start by looking at a body part, for example the Left Arm. The first thing I do before I start messing around with weights, is make a backup of my model. So if it all goes wrong, at least you can go back to where you were.
The best thing to do is use a BIS sample model as reference, you can use the Arma 1 models or the Arma 2 sample character. Which ever you prefer.
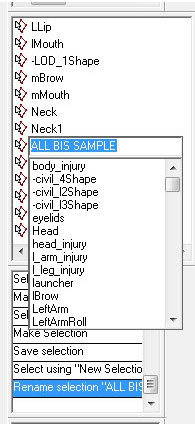
What I do is open up my model and copy over a bis sample infantry model (without any extra proxies). I then move it to the right or left of my model so I can see both together. Its probably good to make a selection called something like “All BIS Sample”. So with the BIS sample completely selected, right click in the selection window and choose the “new” option. Then name it what you want. Doing this makes it easier to delete the sample model when you no longer need it as reference.
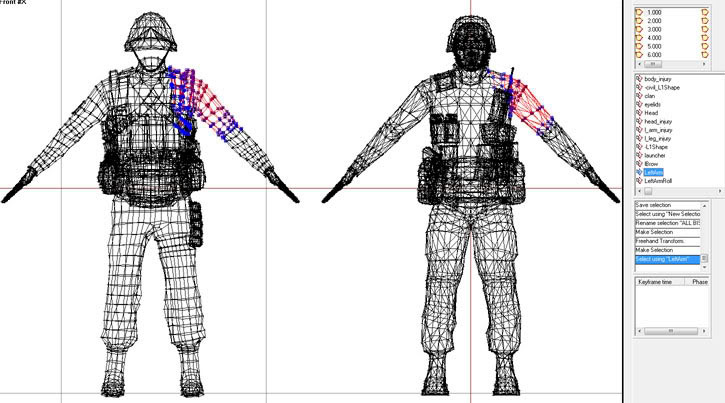
Hopefully what you have now is your own model, and the BIS sample you are going to be using as reference next to it like in this picture below, my model is on the left, and the sample is the ARMA 1 US soldier on the right. As you can also see I can compare how the “LeftArm” selection looks on the reference, and on my model. Unfortunately I can't tell you “how” to weight the arm as it is very much a case of painting on a colour similar to the reference and then testing to see what changes are needed.
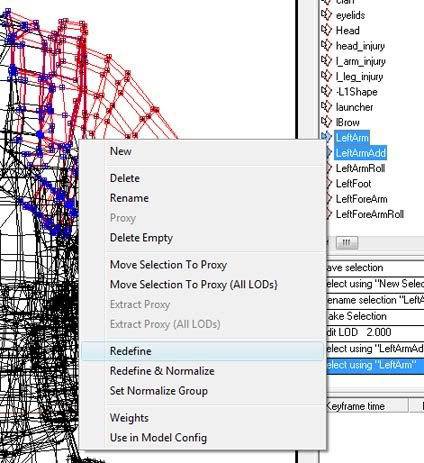
Once you have painted an area and you want to add it to a selection you can either do what was shown above (right click then select “new” and then name it) or if you want to add it to a selection you already have you can right click in the selections window and create a new selection, call it something like “LeftArmAdd”. Then while holding CTRL on your keyboard, select “LeftArm” so that both selections are highlighted. Now you can right click on “LeftArm” and select “Redefine” from the options:
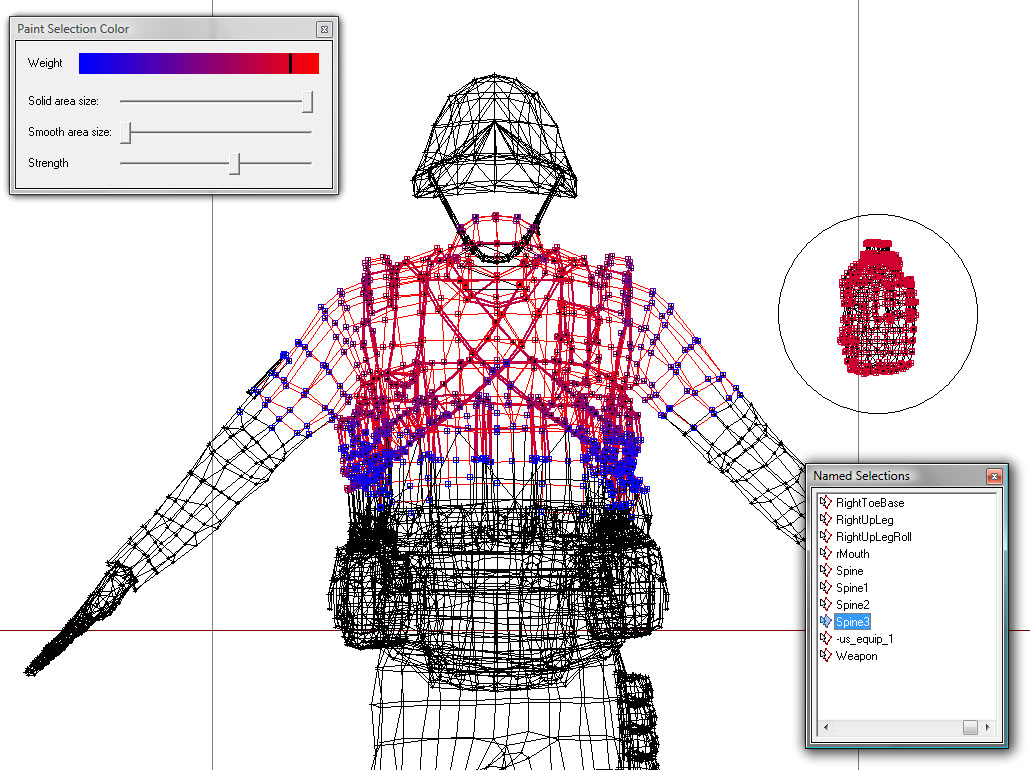
For weighting pouches, you probably don't need a reference model to the side of your own model. Instead what you can do is weight it before you place it in position on your model. So, like in the picture below, I have picked the selection which is closest to where I want my new pouch to go on my model. In this case it is “Spine3”, you can go through the selections clicking on each one until you find one that is approximately in the same position as where you pouch will go. Once you have found one, find a color on the “weight” slider that is closest to the area where your pouch will be. Generally I find that it is a good idea to paint ALL of a pouch one weight, otherwise you can end up with the pouch twisting as different parts of it are being affected more, or less by a selection. That's not to say you can't have a pouch defined to “Spine3” and “Spine2”, just its a good idea to make sure the WHOLE pouch is defined to both.
Now to add the pouch to the selection (Spine3), you can right click on “Spine3” in the selection window and click “redefine”. Make sure that you still have the original points from Spine3 selected or you will lose the weighting originally defined by the selection. If you are in doubt, create a new selection and combine the two as I explained above. Just a quick note, sometimes you may want to weight two parts of one pouch differently so it does twist or bend when the model's body moves, this can be useful for very long pouches. Normally you can work out whether you will need to do this if you imagine the pouch on yourself, if you think it would bend then it might be worth weighting different parts different weights.
That's the main areas of actually weighting a model, like I said, it's not really possible to teach you how to weight each point you will need to weight. Its basically using other sample models as reference and a lot of trial and error. Might be worth having a mess around first just to get an idea of how the sliders affect everything and how that transfers when you click on your model and start painting.

