Table of Contents
ArmA 1 Photographic Image Editing
ArmA 1 Forum, ArmA 1 Home, ArmA 1 Config, ArmA 1 Tools, ArmA 1 File Formats, ArmA 1 Missions, ArmA 1 3D Modeling, ArmA 1 Terrain, ArmA 1 Texturing, ArmA 1 Scripting
ArmA 1 aka Armed Assault (ArmA)
Photographic image editing mini tutorial by Max Power
v1.0 Mar 6th, 2008.
Introduction
This tutorial will teach you how to quickly and easily remove lighting information from photographic texture sources. The raison d'etre for this was to help someone with their island texture and so it's written with satellite imagery as the example. These techniques can be applied to almost any appropriate photo texture source, though. It is geared towards novice photoshop users.
Getting Started
To use this tutorial, you're going to need some version of Photoshop. I know these techniques work in Photoshop cs3 and cs2. I'm not sure at what version these features were introduced into these tools.
I'm going to proceed as if you have very little to no photoshop experience, so bare with me.
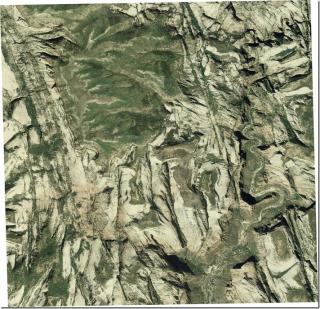
So you have a raw satellite image with shadows from the angle of the sun at the time the photo was taken. This isn't going to jive with your island because the photos may or may not correspond 100% to the topography of your island, and certainly will not correspond to the angle of ArmA's sun 100% of the time, if at all.
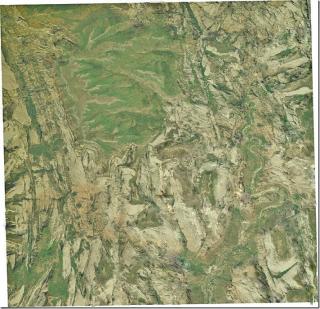
Using the following technique, I was able to get this photograph to a reasonable state in ten minutes. It's very fast and easy. My texture still requires a bit of attention and the image is small, but I think you can agree that it's a fairly good result for ten minutes!
If you want to follow along with this image, you can find that image here.
So, here we go.
Removing the Lighting
Open up your photo texture in photoshop, and find the Shadows/Highlights tool under Image\Adjustments\Shadow/Highlights. For this picture I used values that were something like (I don't completely remember):
Shadows
Amount: 75
Tonal Width: 60
Radius: 0
Highlights
Amount: 41
Tonal Width: 5
Radius: 0
Adjustments
Color Correction: 35
Midtone Contrast: 39
If you don't see all of these options, you have to explode the dialogue by ticking 'show more options'. You'll notice that the color values of the photo will now be squished to the center of the range with the exception of whatever was black in the photo (you can see this in the histogram if you view the levels). The deep shadows will remain and we will require other methods to get rid of them.
Cleaning Up
Let me introduce you to the healing brush tool and the clone stamp tool. To do this particular photo, I didn't use the clone stamp tool, but it offers you more control. On the tools palette, the healing brush icon looks like a band-aid and the clone stamp looks like a rubber stamp. They do basically the same thing, only with the clone stamp tool, you choose what area of the photo to sample from, and with the healing brush, the computer chooses. To get a better idea of what they do, just play around with them until you get it the way you want.
To get rid of the black smears all over the image, use the healing brush with a fairly large brush (for this image I used 32 pixels, 100% sharpness) in very short strokes, and lead in from the edge of the shadow toward the center. If it samples something you don't like, simply keep sampling over that spot or undo and try again.
After you're done, you'll find that you have an image that has fairly low contrast and probably more saturation than you need. Simply edit the hue/saturation of the image and adjust the levels of the image to finish. This is something I didn't do in my example. Getting rid of some color saturation will help reduce some cartoonishness.
I hope this helps you adapt photographic reference to game art in general.


