ArmA 1 How To Import A 3DS Model
ArmA 1 Forum, ArmA 1 Home, ArmA 1 Config, ArmA 1 Tools, ArmA 1 File Formats, ArmA 1 Missions, ArmA 1 3D Modeling, ArmA 1 Terrain, ArmA 1 Texturing, ArmA 1 Scripting
ArmA 1 aka Armed Assault (ArmA)
How To Import A 3DS Model by Panda[PL]
This is a step-by-step tutorial on how to import a 3ds model. It is intended for people who have no idea and weren't around in the OFP times, so that they can make their first addon (I suggest a rifle, and I supply an RVMAT I used for weapon).
This is a TIP (Tutorial In Progress). I will add some pictures, example textures etc. in the future. I also encourage contributions.
NOTE this concerns my private view on the subject and how I do things my way. I do not claim I am perfect.
I assume the reader has some basic knowledge on modeling and rendering, otherwise he has to get these elsewhere.
I intended it to be a simple “what do I push?” walk trough and I do not include detailed explanations of WHY I do things in such a way… You can find the information on BIS Wiki etc. if you want to get more “advanced”. The information on how to use TV2 is supplied for BIS, information on how to use XNormal are on author's website etc - I do not repeat them.
Pointers for modeling:
- all your hard edges should form closed loops (otherwise they will simply be turned into smooth edges).
- when unwrapping try to avoid cutting along soft edges (will save you some fixing later, see below).
- model has to be tessellated into quads and tris (If you have multiple vertices along one straight edge do it manually - otherwise algorithm can create a zero-surface face out of these vertices positioned in line).
When importing the model gest cut along hard edges and along the edges where texture mapping is not connecting (places that were cut when unwrapping). In other words you get this. Note I was unwrapping outside of O2, this happened upon importing a mesh with UV coordinates and smoothness set in a correct way.
Pointers for texturing:
- no shading or illumination effect
- add lighter color to the edges - effects of wear
- add dirt and scratches etc. Remember you might need scratches for your specular amp later on, so use a separate layer
- you can add Ambient Occlusion with low % of alpha in overlay mode, it will make it look less flat when displayed in low settings. But don't overdo it. Later on about it.
Pointers for Import:
- use 3ds format best
- the alignment in-game is in most cases decided by alignment in O2. Open an BIS M16 sample model and just place the rifle where it is to have it appear in proper position in the game.
- if error is reported the file has to have fake KFData section (whatever it is). Opening it and saving with Deep Exploration or using one of the following: Anim8tor, 3ds Max5 or Unwrap 3d will fix this by creating an empty KFData section.
- use the following settings (picture):

Squarize means merging tris into quads, can screw up edge hardness. Merge merges back the edges divided upon importing, again an easy way to mess up edge hardness. Models do not get imported with textures anyway, you need to do that manually (see below).
- DO NOT bother to merge (or “fix”) model manually afterward. The binarisation will cut it apart once more anyway, save your time. Just pay attention when selecting not to leave any floating geometry… floating.
Adding textures:
- select faces (usually whole model)
- press E
- fill up the “texture” box with your texture path. The texture should be in P:\myaddonname\ or subfolder.
- you can bring up also vertex properties. The “Normals” box is interesting, you have to judge which method of the first two looks better (I really cannot tell).
Fixing edges that shouldn't be hard:
- Examine any smooth edges you have cut during the unwrapping in 3D application - now they appear hard in viewer! Select with a box each vertice of each of these edges and use “SHIFT+E” to view vertex properties. There are probably two vertices. Press Shift+D to merge them. After doing the same for other vertices along the edge you can select them all (careful not to select extra ones) and press I - to turn the edge they create into a soft one. You might have to select the model and hit F5 (recalculate normals) to see results.
Adding selections, LODs etc:
These are specific for your class of object. I won't go into this, you need to open an existing, NONBINARIZED model and see what's the correct layout.
- While examining a model remember to turn on the “named properties window” - CTRL+1 - this contains some information about current LOD that you might also need.
RVMAT file:
ambient[]={0.750000,0.750000,0.750000,1.000000};
diffuse[]={0.750000,0.750000,0.750000,1.000000};
forcedDiffuse[]={0.125000,0.125000,0.125000,1.000000};
emmisive[]={0.000000,0.000000,0.000000,1.000000};
specular[]={0.393000,0.402000,0.388000,1.000000};
specularPower=35.200001;
PixelShaderID="NormalMapMacroASSpecularDIMap";
VertexShaderID="NormalMapAS";
class Stage0
{
	texture="#(rgb,8,8,3)color(0.2,0.2,0.206,1,CO)";
	uvSource="tex";
};
class Stage1
{
	texture="SIX_Weaponpack\t\M203_NOHQ.paa";
	uvSource="tex";
	class uvTransform
	{
		aside[]={1.000000,0.000000,0.000000};
		up[]={0.000000,1.000000,0.000000};
		dir[]={0.000000,0.000000,0.000000};
		pos[]={0.000000,0.000000,0.000000};
	};
};
class Stage2
{
	texture="SIX_Weaponpack\t\M203_CO.paa";
	uvSource="tex";
	class uvTransform
	{
		aside[]={1.000000,0.000000,0.000000};
		up[]={0.000000,1.000000,0.000000};
		dir[]={0.000000,0.000000,0.000000};
		pos[]={0.000000,0.000000,0.000000};
	};
};
class Stage3
{
	texture="SIX_Weaponpack\t\M203_AS.paa";
	uvSource="tex";
	class uvTransform
	{
		aside[]={1.000000,0.000000,0.000000};
		up[]={0.000000,1.000000,0.000000};
		dir[]={0.000000,0.000000,0.000000};
		pos[]={0.000000,0.000000,0.000000};
	};
};
class Stage4
{
	texture="SIX_Weaponpack\t\M203_SMDI.paa";
	uvSource="tex";
	class uvTransform
	{
		aside[]={1.000000,0.000000,0.000000};
		up[]={0.000000,1.000000,0.000000};
		dir[]={0.000000,0.000000,0.000000};
		pos[]={0.000000,0.000000,0.000000};
	};
};
This is example of file I use for my weapon. It uses specular, normal and AS maps to add more detail.
- you can edit it with material editor or just notepad.
- _SMDI etc suffixes are telling the converter (TexView 2) how to process the file.
How do I make Normal Map:
- either with Heightmap → normal map tool or from lowpoly and hipoly models. Try Xnormal for example.
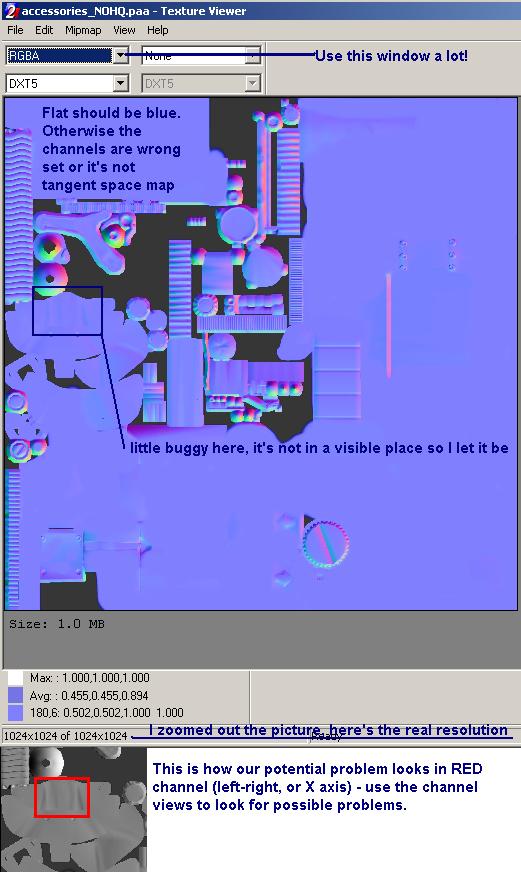
- the Y axis (BLUE channel) is always reversed! In XNormal switch it to Blue = -Y, in other programs tick proper “reverse” window when asked.
Here is how settings look in XNormal:

- it's a wide subject, there are 3D graphics forums for that…
- Save as *_NOHQ.paa
Trick with normal map (if you get “rainbow triangles”):
- when using the hi/low poly method you can get artifacts due to non matching normals of models, even if area should be flat. Just extract Height Map instead and use HM → normal map tool.
How do i make specular map:
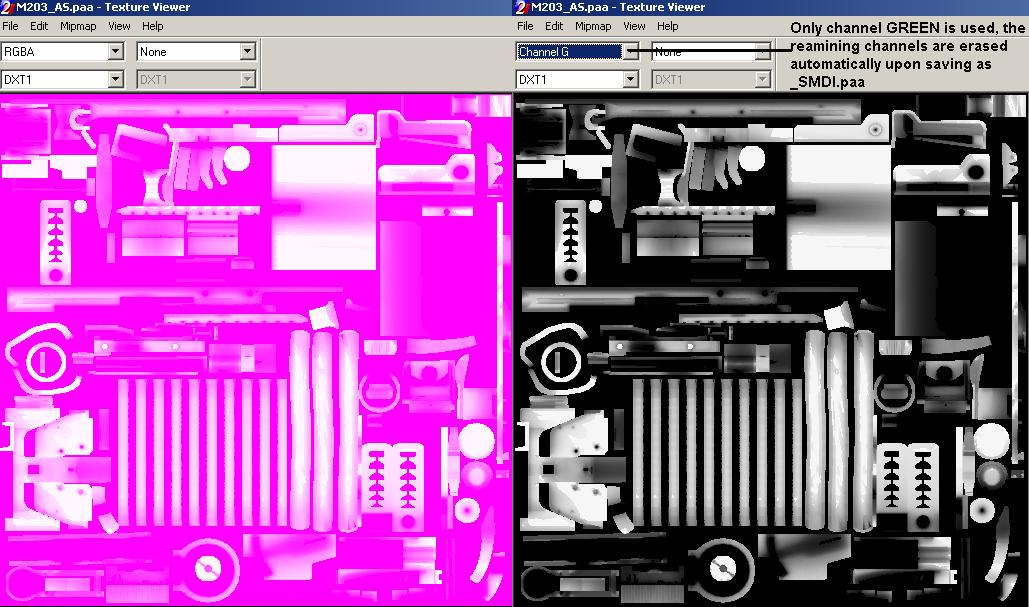
in case of _SMDI map!
- Green channel is specular - IE the brightness of reflected light
- Blue channel is Specular Power - IE the multiplier of the base “specular power” from RVMAT file (with value of 0-1, 0 being no blue, 1 being full blue).
- add scratches to green channel, add also some grease stains (we know how oiled steel looks like) - with much less aggressive values of color.
- Red and alpha will be erased upon conversion, they do nothing AFAIK.
- it's best to copy over the values of Green into the Blue channel, but get rid of black (it will look like complete matte, like frost or snow). Adding 0.2 or 0.3 to values does the trick (Ie making the channel a bit brighter). This way the places that shine will also be less matte and more “polished”, which seems logical.
Example of how my specular map looks like: here.
How do I make _AS map?
- render proper Ambient Occlusion map (once again, XNormal if you don't have any other program, but many other can do the same). You should have nice and smooth gray scale shades…
- save as _AS.paa
- that's it! The channels will get cleared where needed.
This is how an _AS.paa looks like: here.
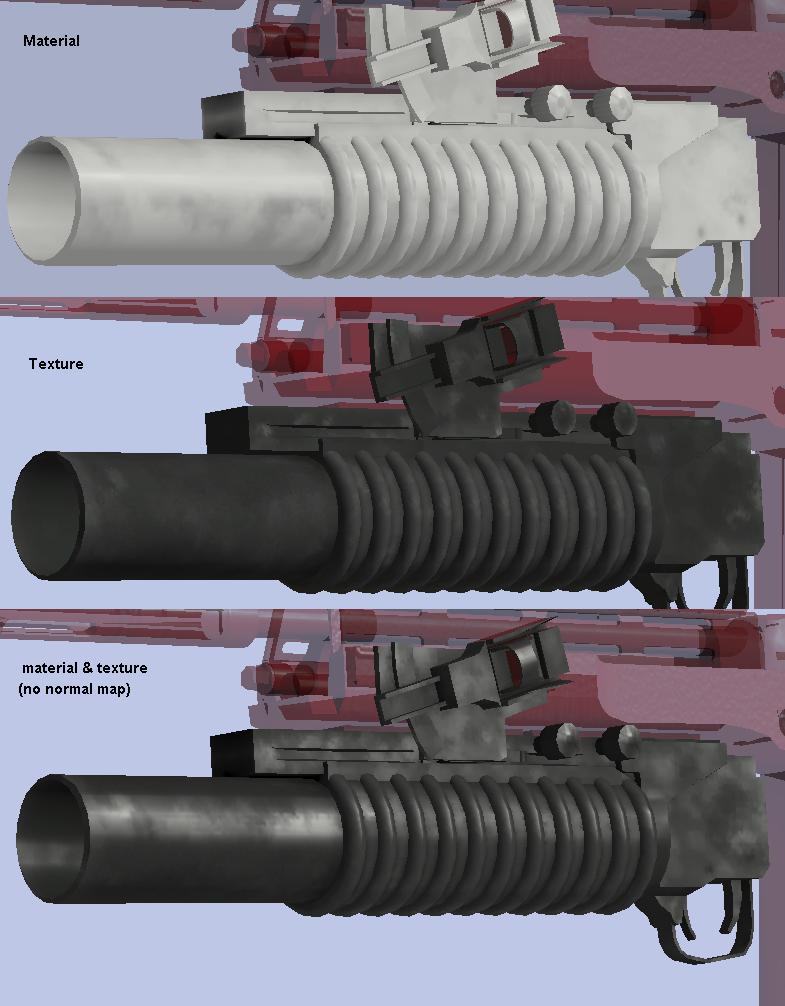
Effects of using AS map, normal map and Specular map: image here.
Normal map is not used because settings are at very low. NOTICE however the fact that AS and SMDI are still used (in reduced resolution). They are less resource-consuming, this is why they are so useful.
Avoiding performance problems
Number of sections (or draw calls?) is the most important factor. Each group of faces using different material or texture file is an additional section. Use only one rvmat per model if you can. Use specular map to make different materials look different (plastic, steel, wood…).