ArmA 1 Texturing Mud Tutorial
ArmA 1 Forum, ArmA 1 Home, ArmA 1 Config, ArmA 1 Tools, ArmA 1 File Formats, ArmA 1 Missions, ArmA 1 3D Modeling, ArmA 1 Terrain, ArmA 1 Texturing, ArmA 1 Scripting
ArmA 1 aka Armed Assault (ArmA)
Texturing Mud Tutorial by DaSquade
Tutorial: How the create realistic mud overlays on objects (samples included).
First of all you needs to know what type of mud you want to create as there are different types of mud effects, some examples:
- Dry sand mud effects.
- Mix of dry sand mud and wet/fresh mud effects.
- Heavy offroad mud effects.
My attempt was creating type 2.
Before we start it is best to collect some useful picture samples, be it from the net or pictures you have taken yourself. Often it doesn't require much specific photos, but it is best to find some that already fit the end result (color and pattern wise).
After adjusting (scaling, copy/paste, patching, cloning) the samples so it cover the object and you placed each sample on an individual layer, we can start working on making mud effects.
Hide all samples and bring one up. It might be best to start working with the softest sample (dry mud type) as often that will cover the most especially on the outsides. Add a 'mask layer' on the sample and make sure it has a black background. This will hide the sample. Now use pattern brush and use white color to paint in the mask layer. Use the brush options 'shape dynamic', 'scattering' and 'texture' to create non-repeated patterns. Use inverted color (black) to soften certain unwanted patterns. Often playing around with the 'burn' and 'blur' tool creates extra dynamics in the pattern.
Once you have a base, do the same with your next sample and build it slightly up. Play around with the sample layer opacity/brightness and contract or even add an color overlay effect if needed.
Use a very thin pencil (1px/sharp) with the 'scattering' effect to create mud splashes.
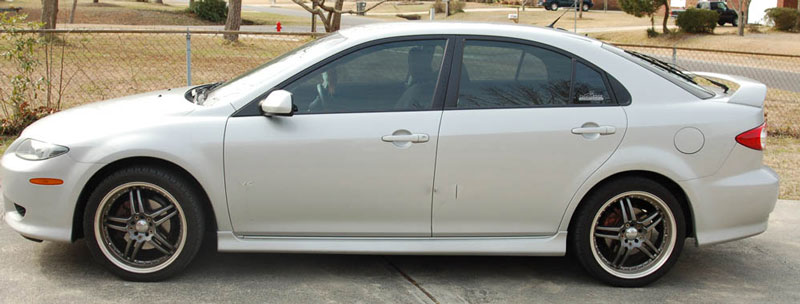
The original:
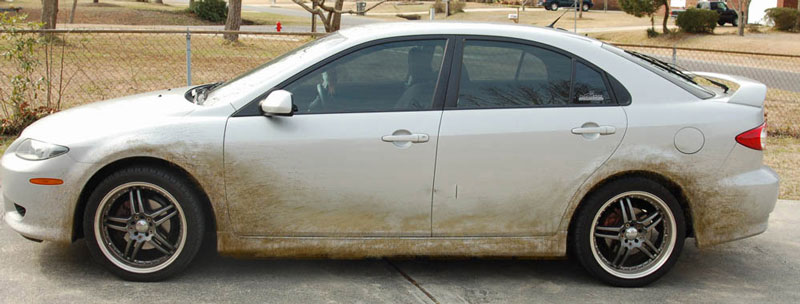
After a good 15 minutes playing:
So far my poor attempt of a tutorial. See car-side_mud.psd example how it was done (it was done pretty fast and noticed there are some flows in it….but you get the idea).
Feel free to add your technics or share your comments. We can all learn of it.
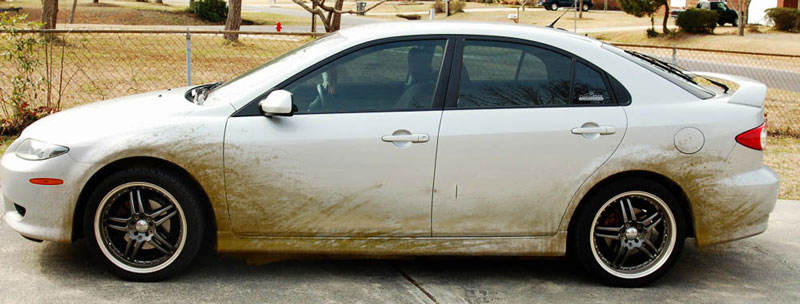
Second attempt after some tips of Jenny. Continued on the first attempt, but this time i use 'splatter' samples for the mask layer.
Download mudtex_tut_psd.rar file from ArmA.1.Tutorial.Include.Files.2024-03-19/ Torrent Magnet:
magnet:?xt=urn:btih:c301fffbfaed4ffc615a804f7b30e8893a1a6d54&xt=urn:btmh:12201411181e7e5e61fcba3785c4ea91017f5f840a25005eb7b9b2ef9b63a1a8fb23&dn=ArmA.1.Tutorial.Include.Files.2024-03-19&tr=udp%3a%2f%2ftracker.opentrackr.org%3a1337%2fannounce&tr=udp%3a%2f%2ftracker.openbittorrent.com%3a6969%2fannounce


