Table of Contents
ArmA 1 Normal Maps
ArmA 1 Forum, ArmA 1 Home, ArmA 1 Config, ArmA 1 Tools, ArmA 1 File Formats, ArmA 1 Missions, ArmA 1 3D Modeling, ArmA 1 Terrain, ArmA 1 Texturing, ArmA 1 Scripting
ArmA 1 aka Armed Assault (ArmA)
Overview
Normal Mapping
Say goodbye to dull surfaces with 3D World's high-speed tour of the games industry’s hottest new technique
If you aim to work in games, it’s worth playing around with normal mapping. Now one of the industry’s hottest topics, normal maps make the surface of a game model look much more detailed and impressive. This detail is displayed in real time: the images in the article are screenshots, not renders. To create a normal map, a 3D software package samples the directions in which the surfaces of a detailed model (a higher-resolution version of the in-game object) face, storing the information as colored pixels. The map is then applied to the lower-resolution object, passing information about the hi-res model to the lighting calculations.
At present, a common approach is to build the hi-res source model immediately, but I feel it can be more effective to start with the lo-res final model. Firstly, starting low makes it easier to revise proportions, and allows for vital early rigging and animation tests. Secondly, once the lo-res is finished, it is a simple job to add polish. I recommend exporting the mesh to ZBrush 2: a great tool for sculpting in organic detail.
ArmA guys
Panda[PL]: IIRC one of devs once said how specular texture should look like:
Red = diffuse
Green = specular
Blue = specular power.
So if you don't intend to change specular power and diffuse then both R and B should be both set to full. If diffuse is not all white (full) then the material gets darkened, if Blue is not all white then the value you input as specular power in rvmat gets multiplied by this value (which is treated as a number between 0 and 1, not 0-255). Texture for specular should be “1,x,1,1”, where x is specular, unless you want to modify the diffuse and specular power.
Panda[PL]: The problem with specular map is: it needs two channels to work! The texture is 2D, so one channel supplies only information on how the light is applied along one axis.
My advise on normal maps:
1) draw a height map (lighter the color the higher the point), you can use the normal texture here if you're really in a hurry, but I advise making it by hand.
2) use programs like Xnormal to convert it to normal map.
The correct channel settings seem to be:
+x -Y +Z
That's what I find easy and it has one basic advantage: all the software you use is freeware.
Another way would be making a hipoly version and using the program to make the normal map by comparing them. But for that you'll need a “pro” program to make hipoly version.
This is an alright explanation even if the final product looks like crap:
http://www.quake3bits.com/htm/tutorials/creating_bumpmaps_from_images.htm
Here's more information and how to convert from a bump map:
http://www.bencloward.com/tutorials_normal_maps4.shtml
Tutorial for normal mapping:
http://www.bencloward.com/resources_tutorials.shtml
http://www.3dxtra.cygad.net/list/561/1.htm
http://www.coronach.org/tutorial1.html
http://forums.cgsociety.org/showthread.php?f=39&t=479896
D@nte:
http://www.bencloward.com/tutorials_normal_maps1.shtml
http://www.bencloward.com/tutorials_normal_maps10.shtml
http://www.poopinmymouth.com/tutorial/normal_workflow.htm
and a tut which shows how to create a bump map with photoshop (you need the nvidia plugin to convert the bump map to normal map)
Normal Maps Tutorials
Normal Maps Tutorial by freddern
Normal Maps Tutorial for ArmA by freddern
Tools used in this tutorial:
- Photoshop
- xNormal plugins for Photoshop (install the program and it installs the plugins too) http://www.xnormal.net/
- TexView2
First of all I would like to say that this may not be the best way to make normal maps for ArmA, but I't works for me and I'm satistfied with the results. (My native language is not English so bare with me)
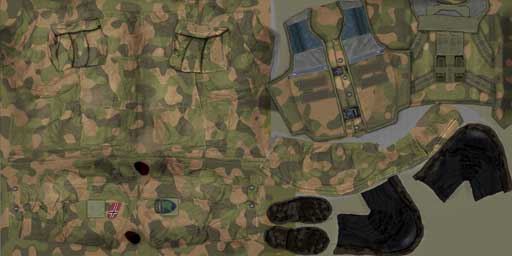
In this turitorial I'm going to show you how to make a new normal map for a us soldier. I'm using my own diffuse texture as an example to show you what I want the new normal map to be based on.
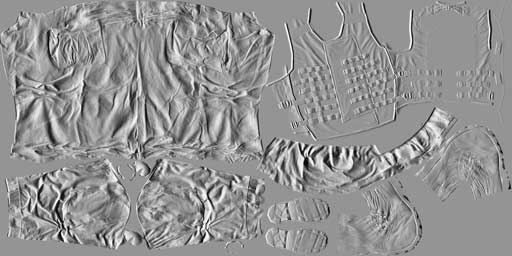
As you can see in the diffuse texture , most of the changes are on the vest and the new armpads. The rest of the texture will look great with the original normal map. So this means that I'm going to add my own vest and armpads to the original normal map.
But how do you do this?
If you have created your own texture you probably have the whole thing separated in different layers, right? Just delete everything except the parts you want in the new normal map, and all you have left are the layers that makes the details you want (In this case the vest and armpads).
Then desaturate everything (I think just turning the image to grayscale will give you trouble later on). Now, give the whole image a gray background and then kind'a play with the image so that you get something similar to a height map. (White is high and black is low).
It dont have to be a perfect height map. The trick is just to give all the little details some depth.
Now you have somthing like this:
Use the xNormal plugin and choose Height2Normals.
As source you may choose Gray scale (seems to be the most logical choise), and set Swizzle to X+ Y- Z+ (I read somewhere that this would give the most similar result to the ArmA original Normal map).
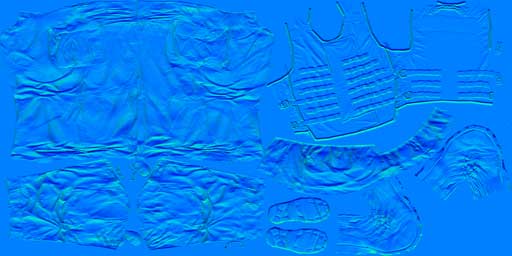
Now, copy the image you've created and paste it as a new layer over the original normal map, but wait! The Normal map you created with xNormal got a more red'ish look than the original.
Don't worry. Just press Image → Adjustments → Channel Mixer and drag the “Red” slider down to zero %.
Note: I think you need to leave the red channel as it is, your original normal map above seems to be missing the red channel. Did you use TexView2 or Kegety's plugin to open the original normal paa?, if you used Kegety's plugin the red channel gets put in the alpha channel and needs to be copied into the red channel to give you a proper normal map.
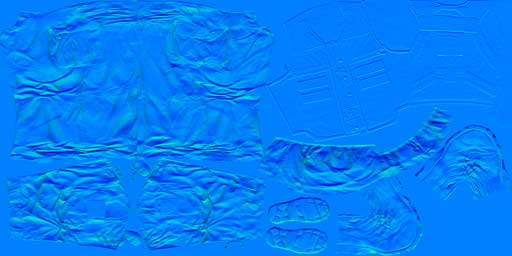
Now you can cut this layer so that you get the new vest and arm pads with the old pants and shoes etc…
Looks finished now don't it?
Not quite.
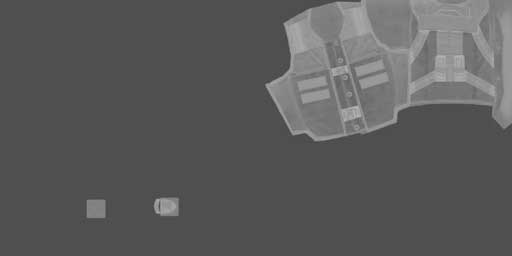
You also have to modify the alpha layer. Make sure you have the channles window open and press “alpha 1”.
Now you see this:
Select the whole image\alpha picture and copy it, select RGB channel, then paste so that you get a copy of the alpha channel in a regular RGB layer and can modify it as you wish.
Now you can make your details (vest and armpads) in to something similar as the alpha map (Maybe use xNormal plugin → Normals2Cavity and a little Brightness\Contrast untill the colours fits the rest of the image.)
Merge these “alpha looking” layers you have been working with, copy the image, press “alpha 1” channel in the channel window and paste the image.
Now press the RGB channel and make sure your normal map is showing (not the “alpha looking” layers you were working on).
Flatten the image and save as 32 bit TGA. Load it in TexView2 and here you can look at the alpha channel or RGB channel seperatly or blended together.
Save it as a Paa file and there you go! Your own normal map.
I'm not going to write about how you get the normal map ingame, partly because that's a different subject and partly because I have not figured it out myself yet.
Have fun!
Normal Maps Tutorial by Skaven
Normal Maps Tutorial by Skaven
Ok, than we start with custom models since applying normal maps to BIS's models takes a long time to do and it's extremely boring because of the hex editing, I just did it once for trying and to be honest I didn't find it that useful if you make good textures, BIS normal mapping will still be working although not as well as custom normal maps.
Ok here we go, good luck! You will need it my English is bad.
I do my normal maps in photoshop but you may do it inside your 3d software, however I'm not a modeler so I will use only the Photoshop tutorial here and to be honest so far and in my opinion the quality seems to be exactly the same.
First thing to do as I told you is to download my RACS addon and to check how I did the config.cpp (Weapons config.cpp), it's really easy you just have to open two classes as you can see from my file and add the correct name for your mapping class/material as well as the correct names for the texture files, being the first ones the
Normal textures:
*.paa
Then the Nvidia Normal Map textures
*_nohq.paa
And last the file that gives the amount of color to the normal map, optimised Specular Map for better bitdepth
_smdi.paa
What I wrote above covers everything you need to start on the cpp file and it's pretty easy to do, just be careful while writing the config a small mistake on a coma will be enough to won't make it work and you'll take a long time to understand where you made a mistake.
Now the textures themselves.
The first thing you will need to do is to download the Nvidia PlugIn and install it inside photoshop than open all the texture files you want to normal map inside photoshop.
Once in Photoshop you have the filters above, inside of it you will have a new one called Nvidia… press it and you will see a new window, inside of which all I do is to change the percentage of normal mapping. Personally I use values between 3 and 10 but you will have to try this one for each weapon (maybe texture) since it does have a lot to do with the type of colors the textures have as well as to how detailed the models are.
It's really try and error here but I would use a value like 5 for my first try. Press enter or apply and you will see your old texture with the normal mapped filter applied now you save it as *._nohq.paa (just like you did inside the config.cpp file) and you place where you described.
Personally I use a new folder for my normal maps but this is actually a matter of organization you may not feel the need for it.
Once you applied and saved the normal mapped textures (Nvidia Plugin) you want to make the pink textures (the ones I don't recall the name in English).
So to achieve that you will take one of mine and you will copy the pink color from one of my them since that's exactly the pink you will need.
Once you did this, now you will again, open the textures as you did at first (or you may just go to history and go a step backwards so you have your textures like they where initially withouth the Nvidia PlugIn).
With this done you will now open a new layer for each texture and paint the layer with the pink you got from my addon (paint the entire layer) once you did this for all the textures you will now give it instead of the usual 100% opacity/transparency you will give it something between 85% and 95%, too much will give less power/color to the normal map too less will make it shine too much and make it ugly, again you will have to try and error but I say go for 95% on your first try.
Once you did this for all the textures you have to save them *_smdi.paa (again put this files where you declared on your config). Now open the model INSIDE O2 (not GateBuilder) and normalize (F5) all the lods.
Hopefully if you understood my tutorial (I'm Portuguese and English is my third Language) than it should be working, go try it in game
PS1: At the beginning this may seem complex but in reality it's extremely easy the problem is that a small mistake in the config file or while naming the normal mapped textures won't allow it to work and it will be very hard to spot the problem.
PS2: The values declared inside the config like the power are values that indicate the power/type/light and amount of normal maps, personally I didn't use them much but I may give you further assistance on this if you need me to.
For now just go try it and tell me if it worked, tell me also if you got this pm, since it's a large one I have a safe copy just in case.
Have fun and good luck, btw, next to normal maps I think you should make shadows which is even easier, I can teach you that also if you need me to.
Valvesoftware Normal Map Tutorial
If your texture is supposed to have depth to it, adding a normal map (successor of the bump map) will make the lighting on it far more realistic (This is perhaps the main reason Doom3, FarCry, and HL2 are able to look so much better than previous games). While bump maps only used one channel to decode the height of each pixel, normal maps use all three:
- The blue channel decodes the height of the pixel (Z-axis)
- The red channel contains the horizontal slope (X-axis)
- The green channel includes the vertical slope (Y-axis)
With these 3 channels, every pixel has a normal vector, means the engine knows in which direction the pixel is facing and can thereby calculate shadows and highlights.
A normal map is kind of useless for really flat surfaces like smooth concrete or metal. But even rough concrete sometimes has enough depth to it to make a normal map worthwhile. This is an old article but explains the concept well: Normal Maps
The normal map should be created in the same dimensions as the image texture (color map) it will go with. There are a few options for how to create one, depending on the quality you want, your skill with various programs, or your patience.
Normal Map from an image editing program
Photoshop or Paint Shop Pro
Note: As of Jasc Paint Shop Pro version 9, the NVIDIA normal map plugin no longer works. Use Photoshop or GIMP instead.
If you have Photoshop or Paint Shop Pro, you can use NVIDIA's normal map tools, available here. To use them, open a copy of the texture and apply the Normal Map filter. Fiddle with the settings until you get something that you feel will be bumpy enough for your texture. The greater the range of colors, the greater the range of angles on the surface. A very flat surface will look that medium blue color all over. If you want to have more control over it, change the image to grayscale and fiddle with brightness and contrast to make certain details stand out before applying the filter. Be sure to change the texture back to RGB mode, or else the normal map tool will not work. Do this step multiple times to get different details to stand out, and then put the images together in layers with the blend mode set to overlay.
GIMP
Place the windows in a useful way. Download the tool for GIMP here and install it following the instructions in the readme.
After restarting GIMP, open a copy of the texture you want to create a normal map for and click:
Filters → Map → Normalmap…
Before starting, you should click the 3D Preview and place it next to the normalmap window. It will automatically update when you change your settings and will be a great help checking the results in GIMP. Select a shape similar to what your texture will be placed on ingame (e.g. a texture for brushes fits onto a cube whereas a modelskin might look better on a sphere). Make use of the UV scale to find a good setting. Now focus on the Normalmap window again. These are the most useful settings:
- Filter - different ways to calculate your normal map. You'll have to try out which one works best for your texture
- Minimum Z - the lowest height on your normal map
- Scale - Use this to control the height of your surface. Results change when you choose a different filter
- Conversion - Let's you choose what is used to create the normal map. Max/Min RGB or only one color channel can be very helpful sometimes
Checkboxes
- Wrap - Normal map will pattern seamless. Definitely use it for map textures!
- Invert X/Y - If your normal map seems to be upside down, this will help
Check the 3D Preview from several angles, also move the light around. When you've found the best setting, hit OK and your texture is converted to the normal map! You can either go with that right away or rework it by hand. For example, you could duplicate the layer and use some overlay effects (Dodge, Addition, …) or paint on the texture yourself if you want to create a flat part (RGB #7f7fff is flat).
Normal Map from a 3D program
XSI
- ver 5.0: Ultimapper
- ver 4.x: GPU Surface FX2
Note: You need XSI foundation or higher to take advantage of this feature, as the Mod Tool has a resolution limit.
- ver 3.5: GPU surface FX
The name has been changing, but the basic usage is the same:
- Move the high resolution model over the low resolution model.
- Select the low resolution one.
- Select GPU Surface FX2 (or Ultimapper in ver 5.0) from Get>Property.
- In GPU Surface FX2 menu:
- Pick the high resolution model (or group).
- Make sure normal is checked.
- Change settings such as normal map resolution, path, sampling, as you want.
- If you are ready, click Regenerate button. XSI will make the normal map.
- To preview the result, set Preview Display and Hardware correctly and click Create Preview.
- Important: It is necessary to invert the green channel of the output file. If you don't do this, your up/down normals will appear inverted in the engine. The simplest way to do this in Photoshop is to open a channel window, (window:channel) select the green channel (which controls up/down), and press Ctrl+I.
Getting the Normal Map in the Game
- Save your normal map as a TGA in the same resolution as the original texture. Give it a name that ends in _normal. Then convert it to a VTF. The _normal at the end of the name will affect how Vtex converts it. For the brick wall example, we would name the file brickwall_normal.tga. Place the new VTF in the same place as your original texture.
- Add this line to the VMT somewhere between the braces:
"$bumpmap" "texture name"
and fill in the path and name of your normal map VTF. Here's an example VMT for a normal-mapped material:
"LightmappedGeneric"
{
    "$basetexture" "walls/brickwall"
    "$surfaceprop" "brick"
    "$bumpmap" "walls/brickwall_normal"
}
Note: Multiple materials can use the same normal map file.
- When compiling your maps with vtex, Add this line to the <texture filename>.txt file in the same directory as your textures then compile with vtex.
"nocompress" "1"
"normal" "1"
See also
Source valvesoftware
Normals Maps by Jérôme 'JeGX' GUINOT
Introduction
Normal-map, also called bump-map, is a texture in which each texel (texel = texture element) contains a normal XYZ vector. In an usual texture, still called color-map, diffuse-map or base-map, each texel contains a RGB color. Fundamentally, there is no difference between a normal-map and a color-map except the interpretation which is given to the texels.
The normal vector contained in a texel of a normal-map represents the vector perpendicular to the surface of an object on the considered texel. In this quite particular case, the normal vector has the {0.0, 0.0, 1.0} triplet as XYZ components. Such a vector indicates that there is no deformation (or relief) at the level of the pixel. In order to modify the surface, using a different vector is sufficient, for example vector {0.2, 0.3, 0.93 }. An important detail for those which would like to generate their own normal-map: a normal vector is always a unit length, i.e. sqrt(X2 + Y2 + Z2) = 1.0 where sqrt() is the square root function.
The main use of a normal-map is the (per pixel) description of an object's surface. This very accurate description, as it is made at a pixel level, is used in the bump mapping and per pixel lighting algorithms. The built-in lighting algorithms of the graphics controllers use the per vertex normal, which leads from far to a non-realistic lighting, unless the number of polygons becomes very large (but in this case we will have some rendering speed problems!). Thanks to the programmable shaders (vertex and pixel shaders), one can from now on achieve lighting calculations at the pixel level by exploiting the normal-maps which leads to get a very realistic rendering without having high polygons models.
Generally, a normal-map comes from a color-map. This is done with normal-maps generators. Let us see all that in detail.
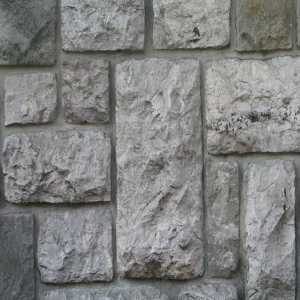
First, here is a color-map:
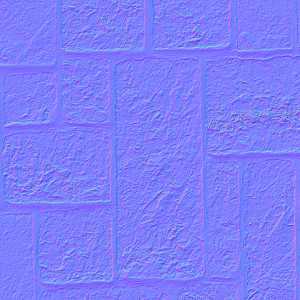
And here is the normal-map generated from the color-map:
The tool that I've used to create the normal-map was available at a time on the nVidia website. May be it is still there but in a hidden directory. To save time, you may download it at the end of this page. This tool, nmapgen.exe, is a small software that works only in command line (I love this type of tools!). I also include the bat file that goes with it and that makes it possible to directly generate the normal-map with a simple double click. The XpConfigurator tool enables you to install the opening of a Dos Shell with a mouse right click within Explorer. This is very convenient to generate anywhere a normal-map.
The Photoshop plugins provided by nVidia to create a normal-map may be downloaded from the following page: Adobe Photoshop Plug-ins.
A normal-map may be recognized by its bluish color. I told you that each texel contains a XYZ vector. If one tries to directly visualize a normal-map with a simple image viewer, each texel will be interpreted as a RGB color. That means that the X coordinate of the normal vector will be read as the R (red) component of the color, Y will be read as the G (green) component and finally the Z coordinate will be comparable with the B (blue) component. As the normal-map representing the surface of the object is expressed in tangent space (for explanations, please refer to this tutor: Bump Mapping with GLSL), most of the normal vectors will have a Z coordinate much greater than both the X and Y coordinates. Z being interpreted as the blue component of the color, the normal-map will be overall bluish.
The use of normal-maps in bump-mapping is explained in this tutorial: Bump Mapping with GLSL.
Download here.
Misc Tutorials
http://www.drone.org/tutorials/normal_maps.html
http://www.drone.org/tutorials/displacement_maps.html
http://www.drone.org/tutorials/displacement_maps_mental.html
http://www.drone.org/tutorials/rayDisplace_workarounds.html
http://www.drone.org/tutorials/rayDisplace_mental.html
http://www.pinwire.com/article82.html
http://amber.rc.arizona.edu/lw/normalmaps.html
http://www.ionization.net/tutsnorm1.htm
http://be3d.republika.pl/howto_d3_normalmap.html
http://reblended.com/www/alien-xmp/Tutorials/NormalMap/NormalMap.html
http://dynamic.gamespy.com/~polycount/ubb/Forum8/HTML/002497.html
Utils
This article lists all known Normal Map tools.
Normal Mappr
Normal Mappr by TomorrowPlusX topic here.
Enter NormalMappr!
It's document based ( and the dev version which I'll release soon handles batches ).
It's UB, and works pretty well. Below are links for the app and the source. Consider the source “free, as in speech (or whatever you want to do with it)”. That being said, batch operation isn't ready to roll yet so it's not included in the links below:
Here's the app:
http://zakariya.net/shamyl/etc/NormalMappr.app.zip
Here's the source:
http://zakariya.net/shamyl/etc/NormalMappr.zip
Let me know if you like it, or have any feedback for me.
(as a side note, I didn't just write it for myself. Somebody on Ars Technica's Macintosh Achaia (http://episteme.arstechnica.com/eve/...m/726000575831) expressed the same complaint with NMG as I felt, so I figured, why not write it.
Nvidia Tools
Nvidia tools will create normal maps automatically. Check out Nvidia Adobe Photoshop Plug-ins.
Includes:
- NVIDIA Normal Map Filter
- NVIDIA DDS PLug-in
- NVIDIA Mipster Script
- NVIDIA Cube Map Shuffler
The Plug-ins
The NVIDIA Normal Map filter creates normal maps from height maps for per pixel rendering. The DDS plug-in supports the DXTC texture compression format and allows you to open and save .dds files in RGB format. It reads and writes .dds files compressed or uncompressed.
ATI Normal Mapper
Use ATI tool Normal Mapper to make your normal maps. Download it here. Normal Mapper generates normal (bump) maps from a high and low-resolution model.
freddern: I modified my vest texture a bit and made it grayscale before i used a plugin called xNormal → HeightToNormals and then I get a normal map.
There are also a lot of free normal map tools to derive 3d geometry data, like nvidias melody. These programs create normal maps with the help of high resolution 3d models having billions of polygons.
NormalMapCompressor
NormalMapCompressor
NormalMapCompressor is a useful tool to automatically compress your normal maps. This tool uses DirectX 9 (in .NET) to do the job and assumes that the normal maps are stored in the default xyz format (NVidia/Doom3 style, opposed to the ATI format where y is inverted). However, all normal map formats should work well with this tool (it doesn't care), but you might want to exchange the fx shader file for rendering.
Download NormalMapCompressor.
xNormal normal mapper
xNormal can read almost all the 3D and picture formats in the market directly so no exporters are required ( although you could use the 3DSMAX included ones to export your cages! ). It supports 3D Studio, 3DSMAX ASE, DirectX, Alias|Wavefront OBJ, Lightwave LWO, Collada 1.4, Kaydara FilmBoX, AutoCAD DXF, Softimage dotXSI, BMP, TGA, TIFF, JPG/J2K, PNG, DirectX DDS, Photoshop PSD, HD-Photo/Windows Media Photo, Greg Ward's HDR, ILM's OpenEXR and many many more formats.
Comes with an OpenGL/Direct3D interactive 3D viewer where you can see at realtime the final result and also with some useful tools like height map to normal map conversion, height map to occlusion map, etc…
It supports advanced options like object/tangent space, multipart loading, swapping coords, fine detail using heightmaps, floating geometry support, mirror UV/Cylindrical coordinates, ambient occlusion/displacement map generation, projective UV texture baking, non-uniform ray distance cages, advanced antialiasing, dual core/hyperthreading, etc…
It includes a complete C++ SDK to write plugins, compute tangent basis and generate normals, etc…
xNormal normal mapper: http://www.xnormal.net/ http://santyhammer.blogspot.com
Nvidia Melody
NVIDIA Melody
NVIDIA Melody creates high quality normal maps that make a low-poly model look like a high-poly model. Simply load your low-poly working model, then load your high-poly reference model, click the “Generate Normal Map” button and watch Melody go to town. The normal map generator can also create texture coordinates from your high-poly reference model using a projection technique.
You can rotate your models and see the normal map in action. A command line version is provided to help you integrate Melody in your content creation pipeline. Read more about how you can get the most out of Melody in the accompanying User Guide.
Please note that progressive mesh decimation (LOD creation) has been removed in the latest release. This allows Melody to generate normal maps for significantly larger models.
Web page here.
Misc Tools
Bake AMAZING normal maps from 2D assets. Enhance normal maps, and blend different maps together. Bake displacement maps and cavity maps.
CrazyBump
What are Zbrush or Mudbox?
http://www.blender.org/development/release-logs/blender-236/normal-maps/
ORB is another normal map generator, converts 3D models into normal maps. Also generates displacement maps, diffuse maps, vertex-color maps. Imports ASE/OBJ/LWO formats. Previewer included. here
