Table of Contents
ArmA 1 Vehicle Damage Model
ArmA 1 Forum, ArmA 1 Home, ArmA 1 Config, ArmA 1 Tools, ArmA 1 File Formats, ArmA 1 Missions, ArmA 1 3D Modeling, ArmA 1 Terrain, ArmA 1 Texturing, ArmA 1 Scripting
ArmA 1 aka Armed Assault (ArmA)
Törni: With damageHide selection (not a LOD) you can hide parts of the model when the it is destroyed. Just what I did with the BMD-1 2.0 addon. The only addon in which the texture swapping is currently working is BTR80 and the model can be opened with O2.
Armored_Sheep (bis dev): New ArmA Damage visualization by animating materials on surface is defined in config.cpp (class damage). Model must contain at least selection “zbytek” that will contain all faces that are animated. You can also use other selections bind in config.cpp in class Hit* as visual=. On top of that the selection must be defined as “section” in model.cfg.
“Zbytek” is Czech word for “the rest” meaning remaining parts. In case HIThull - “karoserie” in Czech - is used, you might not find “zbytek” it the model. All selection names are anyway defined in config.
Hiding animation bind to damage controller is also defined in model.cfg. Each animated part must be well configured in skeleton hierarchy. Model_Config
As you can see in config each turret has its own hitzone definition (class HitTurret, class HitGun) so if you have different named selections for each turret.
passThrough = 1 means that the hitzone is vital to the complete model, so if this “weakspot” is destroyed (he might be just 30% of the whole armor) the whole vehicle blows up. passThrough = 0 means that destroyed hitzone does some effect (windows textures changed, wheels not turning), but the vehicle does not blow up.
Armored_Sheep: For working animated material that is bind to vehicle damage you need:
1) Selection on your model that contains faces with animated material (switch one rvmat to another)
2) Damage materials
3) Section defined in model.cfg for the animated selection
4) Hitzone definition in config.cpp in class HitPoint* where the selection is written
5) Class damage in config.cpp where switching materials are defined
6) Model and all its sources must be binarised (packed) in PBO
Linker_Split: The rvmats you are using must point also to the texture you are using.
Example: Your model got a texture named: front_door_co.paa.
Then the Rvmat you define in the config must also point to this texture, otherwise the engine will not recognize the texture and will not replace it with the destruct one.
Also it appears that you cannot damageHide a already animated selection, good examples are helicopter rotors made the old OFP way (the new ArmA proxy way apparently works?). So be careful and test your damageHide selection by selection before overhauling your whole model.
Selection names
Obmar posted this about selection names:
To get the Damage textures to animate you have to have a specific entry in the model's Named Selection, in all the Resolution LODs. To do that you have to select all the surfaces of the model you want the damage textures to animate in O2 and give the entire selection a specific name. The different type of vehicle models have different names applied to the model's sections. I am listing the Names applied to the damage selections in the different models…
| Selection Name | Vehicle type |
|---|---|
| trup | Helicopter |
| telo | Tracked vehicle |
| karoserie | Wheeled vehicle |
| zbytek | Aircraft |
Once the actual model has the named selection in all the Resolution LODs the damage texture animations will work.
Please note that for aircraft's selection name like “body” will work just fine, but for tank vehicles, it won't work anymore. Why? we have no idea. If you configure tank with “body” selection name it won't work but as soon as you change it to “zbytek” it will work fine. Go figure. Also do not try to add damageHide into tank's turrets, it wont work as then the objects won't animate normally, you need to use the damageVez maybe?
bis Example
Here is example damage config from bis A10 aircraft.
dammageHalf[] =
{
	"\ca\a10\data\a10_glass_ca.paa",
	"\ca\a10\data\A10_glassBR1_CA.paa"
};
dammageFull[] =
{
	"\ca\a10\data\A10_glass_CA.paa",
	"\ca\a10\data\A10_glassBR1_CA.paa"
};

class Damage
{
	tex[] = {};
	mat[] =
	{
		"ca\a10\data\A10_01.rvmat",
		"ca\a10\data\A10_01.rvmat",
		"ca\a10\data\A10_01_destruct.rvmat",
		"ca\a10\data\A10_02.rvmat",
		"ca\a10\data\A10_02.rvmat",
		"ca\a10\data\A10_02_destruct.rvmat"
	};
};
The model itself contains damageHide selection in 1-6 Res LODs and others containing the weapon and pilot proxys only. Last 7.0 LOD don't have damageHide.
The zbytek selection is present on all LODs. It contains everything except weapons, wheels and canopy glass.
In the AH6 and AH1 helicopter models are no zbytek selection… in the AV8B there is zbytek again.
[APS]Gnat Example
[APS]Gnat example:
Warrior0_destruct.rvmat file:
ambient[]={1.0,1.0,1.0,1.0};
diffuse[]={1.0,1.0,1.0,1.0};
forcedDiffuse[]={0.0,0.0,0.0,0.0};
emmisive[]={0.0,0.0,0.0,1.0};
specular[]={1.0,1.0,1.0,0.0};
specularPower=40.0;
PixelShaderID="NormalMapMacroASSpecularDIMap";
VertexShaderID="NormalMapAS";
class Stage1
{
	texture = "GNT_PiperWII\Warrior0_NOHQ.paa";
	uvSource = "tex";
	class uvTransform
	{
		aside[]={1.0,0.0,0.0};
		up[]={0.0,1.0,0.0};
		dir[]={0.0,0.0,0.0};
		pos[]={0.0,0.0,0.0};
	};
};
class Stage2
{
	texture = "ca\data\destruct\vehicle_destr1024_1024_mc.paa";
	uvSource = "tex";
	class uvTransform
	{
		aside[]={1.0,0.0,0.0};
		up[]={0.0,1.0,0.0};
		dir[]={0.2,0.0,0.0};
		pos[]={0.2,0.0,0.0};
	};
};
class Stage3
{
	texture = "#(argb,8,8,3)color(1,1,1,1)";
	uvSource = "tex";
	class uvTransform
	{
		aside[]={1.0,0.0,0.0};
		up[]={0.0,1.0,0.0};
		dir[]={0.0,0.0,0.0};
		pos[]={0.0,0.0,0.0};
	};
};
class Stage4
{
	texture = "ca\data\destruct\vehicle_destr1024_1024_smdi.paa";
	uvSource = "tex";
	class uvTransform
	{
		aside[]={1.0,0.0,0.0};
		up[]={0.0,1.0,0.0};
		dir[]={0.0,0.0,0.0};
		pos[]={0.0,0.0,0.0};
	};
};
And the main Config now has;
class cfgModels
{
	class Plane;
	class PWII: Plane
	{
		skeletonName = "GNT_PiperWIIBones";
		sectionsInherit="";
		sections[]=
		{
			"vrtule staticka",
			"vrtule blur",
			"clan","clan_sign",
			"zbytek"
		};
.........
.........
class CfgVehicles
{
	class All {};
	class AllVehicles: All {};
	class Air: AllVehicles {};
	class Plane: Air
	{
		class NewTurret;
		class AnimationSources;
	};
	class GNT_PiperWII: Plane
	{
..........
..........
	class Damage
	{
		tex[] = {};
		mat[] =
		{	"GNT_PiperWII\Warrior0.rvmat",
			"GNT_PiperWII\Warrior0.rvmat",
			"GNT_PiperWII\Warrior0_destruct.rvmat",
			"GNT_PiperWII\Warrior1.rvmat",
			"GNT_PiperWII\Warrior1.rvmat",
			"GNT_PiperWII\Warrior1_destruct.rvmat",
			"GNT_PiperWII\Warrior2.rvmat",
			"GNT_PiperWII\Warrior2.rvmat",
			"GNT_PiperWII\Warrior2_destruct.rvmat",
			"GNT_PiperWII\Warrior3.rvmat",
			"GNT_PiperWII\Warrior3.rvmat",
			"GNT_PiperWII\Warrior3_destruct.rvmat"
		};
	};
And for each Resolution LOD of the model I did a Select-All and named the selection “zbytek”. It works quite nice!
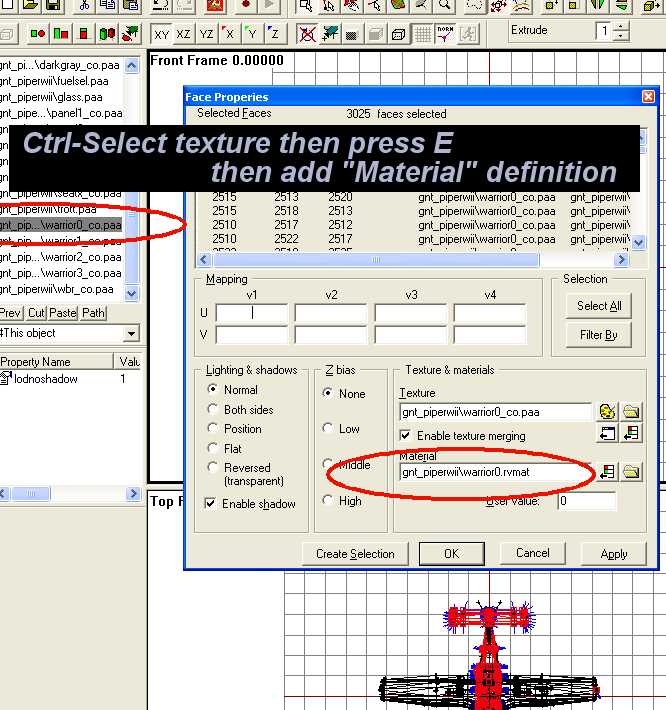
The P3D file in O2 needs to have this bit added for each texture used. The Face Properties need the Materials definition to point to the rvmat file
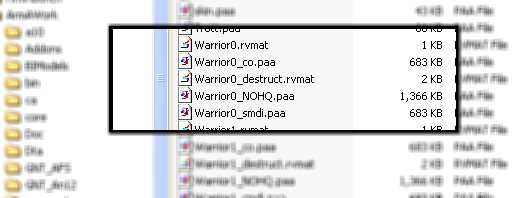
And to clarify, all these files are needed (until experimentation proves otherwise) to enable damage textures.
Best of luck :)
damageHide Additions
This effect usually pops up, when a selection is only partial included in the “damageHide” section. For me, it seems that all “damageHide” sections get moved below ground level at destruction, causing such effects.
Also some issues may pop up, when other “active” sections are included in the damageHide section. You may check the T-72 model included in the bis samples and check the tracks. Each damper section has its own damageHide section, else the same effect would pop up on the tracks.
There are few things you need to know.
- The damageHide animation will move the selection to the center of the model. Make sure that they are not connected to other parts which will remain after destruction, like you can see it on your screenshot.
- If you want to make a selection animated and hidden after destruction, make a separate damageHide animation for it, otherwise the animation will be influence each other and your translation or rotation will be effected.
I suggest making 2 levels of landContact, the bottom layer is named like the suspensions and will be removed after destruction. The other layer is at the height of the chassis. That way your truck will look like it rests on the visible elements which are left after destruction.

