Falcon 4 Zaggy's Tile Meistering Tutorial
Falcon 4.0 Forum, Falcon 4 Home, Falcon 4 Campaign, Falcon 4 Cockpits, Falcon 4 Database, Falcon 4 File Formats, Falcon 4 SRTM Terrain, Falcon 4 Terrain, Falcon 4 Textures, Falcon 4 Tools
OK… Welcome to Tilemeistering 101 with Zaggy.
So you all want to know how to make tiles? Its really not too hard. Once you learn how to manipulate a few basic Photoshop functions, it suddenly becomes very, very easy. Just ask Snake Man; I had him creating generic terrain textures in less than 30mins. And if Snake Man can do it, so can you all.
Firstly, what do we need?
We need a copy of Adobe PhotoShop 5.0 or greater (I'll be using 5.0 for this tut, but 5.5, 6.0 and 7.0 will share the same functionality). And, if we are tiling for a specific area, well need reference pictures so we can get our colors correct. A bit of familiarity with Photoshop is desirable.
Secondly, what will we be learning?
Initially, simply doing generic tiles. Then we'll be moving onto doing terrain transitions, feature tiles (like roads and rivers), and finally manipulating aerial and satellite imagery. I chant be telling you everything, but what I don't tell you, you'll be able to work out if you're good enough. Got to leave you with some sort of challenge don't I?
Part One - Generic Tile in PhotoShop
What we are going to do first, is create a nice, simple grassland texture in Photoshop. For the minute, don't worry about references and all that stuff. All it will be is a very simple, tilable (i.e.: repeatable) Falcon 4.0 Tile.
1. Open Photoshop and create a New RGB image measuring 128 x 128 pixel's.
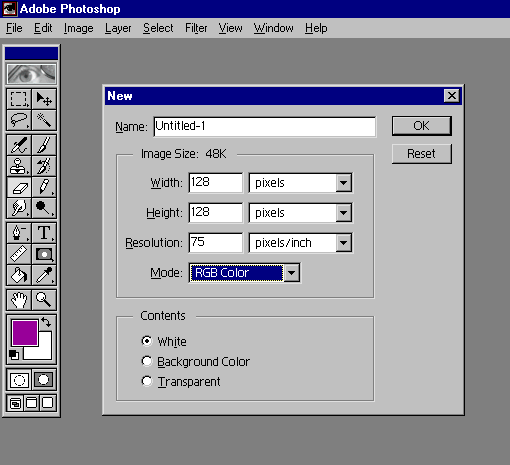
2. Grab the Paint Bucket (the 'Fill' tool) from the tool box (the rectangle full of icons on the RH side of the screen) and then double click on the foreground color at the bottom of the tool box. Were going to choose a green color, and for the sake of this tutorial, just type in the RGB value R:92 G:115 B:42.

3. Fill the 128 x 128 image with the Green using the Paint Bucket (Fill) Tool.
4. Now that we have a green tile, go to Filter → Noise → Add Noise. From the Filter properties box that appears, check the Monochromatic check box, and make sure the Gaussian option is selected. Then, on the Amount slider bar select a noise amount of 12 (typically you'll be using between 5 and 20).
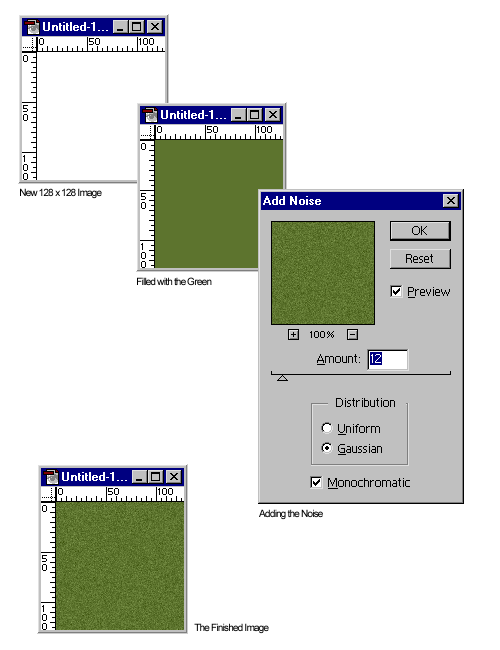
And there you have it. A simple, generic grassland tile, that will easily tile.
For the more advanced user, in between steps 3 and 4, you can select a few variations of the green color we chose (a lighter, more straw version of the green, a more browner green, a lush deep green) , and using the Airbrush tools, with a low opacity value, spray some splotches over the tile.
A word of advice is to stay clear of the edges here, and occasion run the offset filter (Filters → Other → Offset) set to a horizontal and vertical value of 64. This will wrap the edges of the image back on itself, and actually allow us to work on a tilable image a lot easier. The Offset Filter is one of the Key Filters (along with the Add Noise Filter) in tile making. Remember it. Make it your friend. Proper use of it will allow you to make tiles that match perfectly and have no visible joins.
Anyway, play with that stuff for a while, till you are comfortable, and maybe by then, I'll have part two done, focusing on transitions. For that Tut we will use TWO generic textures to create a transition, a grassland texture and a desert texture.
What you'll need to know and do for the next part:
1. How to create these generic textures.
2. You will need Rulers turned on (View → Show Rulers) and you'll need the units set to pixel's
(File → Preferences → Units and Rulers).
3. Know a little about the Layer Control Box (Bottom LH Corner of the UI) and the Eraser tool.
Till then, have fun! Zaggy