Falcon 4 Creating A Full Tilable Sets
Falcon 4.0 Forum, Falcon 4 Home, Falcon 4 Campaign, Falcon 4 Cockpits, Falcon 4 Database, Falcon 4 File Formats, Falcon 4 SRTM Terrain, Falcon 4 Terrain, Falcon 4 Textures, Falcon 4 Tools
Falcon 4 Creating A Full Tile Set (tilable sets).
First you have to decide how many tiles you want. This tutorial is for 9 tiles but you can easily apply it also to 4, 16 or even more if you need to. I took a set of 9 tiles so we have to create a new RGB image of 1536×1536 (3×512). We are now speaking the generic tiles that can be tiled into the terrain type, these are not to be confused with transition tiles. These generic tiles are to be placed inside the transition tiles to make some variation into the terrain.
First fill the background layer with the basic color you want to have. I decided to make a grassland texture so I chose a light green (R:106; G:131; B:102), but you can also make some sand textures the same way.
Then we add some noise layers to make our basic color more terrain like. Create a new Brightness/contrast adjustmentlayer and set the Brightness value to something about -100 to see its effect more clearly. Select the layermask and choose “Image→Select→Invert” from the main menu to change the color of the layermask to black. Then apply the noise filter (Filter→Noise→Add Noise…) with an amount of 55%, uniform distribution and monochromatic set. The noise will add some white spots to the black layermask and therefor the brightness will only affect those and not the whole image. That's why we inverted the layermask.

Then we apply some Gaussian Blur with a radius of 1,0.

We create another Brightness/Ccontrast adjustment layer, set the brightness to +100 and also invert the layermask. Then apply the noise filter with an amount of 40%, uniform distribution and monochromatic set. Now you should get something similar to this:

On top of the two noise layers we create another Brightness/Contrast adjustment layer and set a Contrast value of 50 to enhance the colors.

Since we just set the brightness of our two noise adjustment layers to -and +100 we fine tune them now until we are satisfied. I chose Brightness -28 for the first (the one we set to -100) and for the second (the one with +100) a Brightness of 10 and a Contrast of 55 so it looks like this:
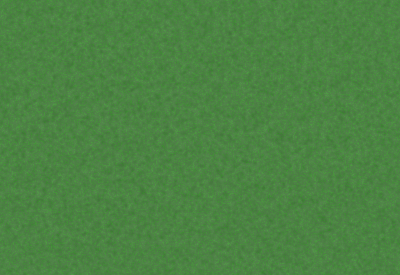
A green texture with soft dark spots and lighter sprinkles. When you are not satisfied with the color of your basic layer then don't try to find the right one to fill it instead of this simply apply a Hue/Saturation adjustment layer right between your color layer and the noise layers and you can tweak the color very easy to the one you like.
To enhance the texture further we create another 2 layers but this time both Hue/Saturation layers and place them between our 2 noise layers and the final contrast layer (the white one). Don't change the settings of the layers right now we do this after the next step. Select the layermask of one Hue/Saturation layer and apply the Clouds filter to it (Filter→Render→Clouds), then do the same with the other Hue/Saturation layer.
A note about filters: Filters are resolution depending! So when you apply a noise or clouds filter to a 512 image you get different results than when you apply it to a 1024 image and size it down to 512. Especially the clouds filter is critical. Sometimes you have to apply the filter at a resolution that is 8 times higher than your original texture to get the right effect. So when the clouds you get from simply applying the filter are too big and you wanted smaller ones then create another image (greyscale if you only want to apply it to a layermask/channel, RGB when you need the colors) with the same size of the original image, resize this new image by 2 or 4 and apply the filter. Then resize the new filtered image back to the original size. Perhaps you have to choose another resize option than “Bilinear” in the dialog to get better results when your image looks a bit blurry after resizing or apply an additional sharpen filter. When you are satisfied with the look of the filter then copy-paste it into the layer or layermask/channel you wanted in your original image:

Now that we have some cloudy layermasks we can tweak the settings of the Hue/Saturation adjustment layers. Try to set the Hue of one layer to the left and the other to the right so you get 2 additional colored patches in your texture. I chose Hue: -38, Saturation:0, Lightness: -10 for the lower layer and Hue: +27, Saturation:-18, Lightness: -12 for the upper one. I also set the Opacity of the upper layer to 72% and the Contrast value of the upper most Brightness/Contrast layer from 50 back to 40, because I thought it was getting a bit too dark otherwise.
The basic texture is ready now and should look like this one:

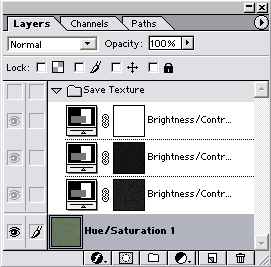
Now that we have the texture for our 9 tiles we have to make them tilable, but first we have to save our layers so that we can always edit them when we come back to this file and make another different texture. So we create a folder (set) in the layer toolbox by clicking the folder icon at the bottom, call it “Save Texture” and put all your existing layers in this Set. You may have difficulties when you want to drag the “Background” layer into the set because it's locked. Then simply double-click the layer and hit OK to make it a normal layer. Now you can also drag it into the set. Now save the file under “Basic Texture Set” or something as PSD to backup the original texture with all its layers. Then save it again under a different name: “Texture Set Tiles” e.g.. This is the file we will work on.
Now we need to merge our terrain into one single layer to edit it further. But before we do that we first separate the noise layers because this small details will get lost in the editing process otherwise. Therefor drag the two cloudy adjustment layers and the basic color layer outside the “Save Texture” set (when you added a Hue/Saturation adjustment layer to adjust your basic color then let this be visible, too) and then hide the set with its layers so that only the layers you dragged out are still visible. Then click on the small arrow at the top right of the layer toolbox and choose “Merge visible” to put these layers into one single layer. When all went fine your layer toolbox should look like this:
After this choose “Edit→Preferences→Guides & Grid” at the main menu and set a gridline at every 512 pixels with 1 subdivision. This will show you a grid of your tiles, if now you might have to set the grid visible in “View→Show→Grid” at the main menu.
Now create a new RGB image with 512×512 pixels. Then select your green texture layer, drag a selection over the lower left tile with the rectangular selection tool and hit CTRL-C to copy this part to the clipboard. When the selection tool doesn't snap to the grid lines enable this in the “View” menu. The lower left tile is in the clipboard now so click on your new 512×512 image and hit CRTL+V to paste it into the image as a new layer. Continue the same way with all the tiles until you have the 9 tiles from your texture image on different layers in your new 512×512 image. Only the noise details are missing and the colors are somehow faded now so we also have to copy the “Save Texture” set into the new image. We do this by right clicking the set, choose “Duplicate Layer Set” and select the title of our new 512×512 image as destination document.
Since all tiles should be tilable itself and also blend smooth when different tiles are set beside each others we have to choose a tile to get the border from for all other tiles. The best tile for this is the one with the fewest dark or bright spots at the border, because this spots will show up on all tiles of the set after wards and might give an unaesthetic pattern when tiled.
So choose the best tile and copy the layer by dragging it onto the “Create new Layer” icon at the bottom of the layer toolbox. Name the new layer “Border” and drag it on top of the layer stack. Now we first have to make this single “Border” layer tilable. You can do this by applying the Offset filter (Filters→Others→Offset) with 256 pixels horizontal and vertical. Then edit the borders until they are seamless with the stamp tool. Finally flip the tile back with the Offset filter again.
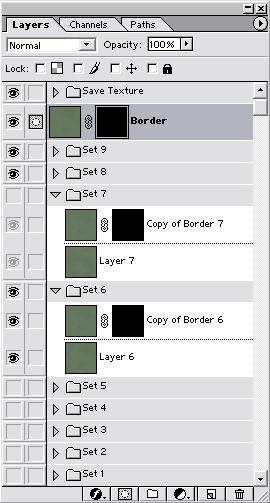
Now that we have our “Border” tile we need to apply it to all other tiles so that they will have the same border for tiling but still look different inside this border. For easier editing we create a new set for every tile layer and drag the according layer into the set. Add a layermask to the “Border” tile, fill it with black and copy it nine times. Then place each copy into one of the tile layer sets so that your layer toolbox looks something like this:
To make the border blend with the tile below you have to edit the layermask of each “Border” copy. You best take a soft paintbrush with about 37 pixels width and paint the outer region of the layermask pure white so that it will be shown at 100% there. Then try to make a smooth transition from the outer region to the rest of the tile without deleting too much details of the original tile. Finally check with the Offset filter if the tile still has seamless borders.
After this procedure the layermask should look similar to this one:

To make the whole 9 tiles blend seamlessly you have to do this with all other 8 tiles. When you're done, copy all the sets with the tiles into your 1536×1536 “Texture Set Tiles” image by right clicking the set, choose “Duplicate Layer Set” and select your “Texture Set Tiles” image for the destination. Drag all the tile sets below the “Save Texture” set so that the noise and the color are also applied to them and they look right again.
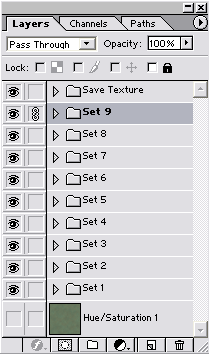
The layer toolbox of the 1536×1536 “Texture Set Tiles” image should look like this after wards:
When you make the lowest texture layer invisible you can see that all the tiles were placed at the upper left corner. To move them into their proper position we first have to chain the “Frame” and the tile layer of each set together by clicking on the box beside the eye icon of each layer. Then select the tile layer and drag both (the tile and the according “Border” layer) into it's place. Because the tile layer is exactly 512×512 pixels it should snap nicely to the grid. If not make sure you selected it before dragging. And make also sure that the according “Border” layer is also dragged and not only the tile layer.
When all the layers are in place it should look similar to the texture you created before. When you notice some unaesthetic pattern between the tiles (switch off the grid for a better view) edit the layermasks of the according tile again until the borders blend fine and there are no unaesthetic pattern left.
Your final image should look something like this one then:

(The dark green lines are just the grid lines to show the different tiles)