This is an old revision of the document!
Table of Contents
PMC ArmA 3 Ultimate Terrain Tutorial
2020-01-01 Update
Same as the legendary Falcon 4 PMC Ultimate Theater Tutorial this PMC ArmA 3 Ultimate Terrain Tutorial will be one stop shop for everything a newbie needs to know about terrain editing.
If you never have edited arma terrains, by reading this tutorial you will have working terrain in arma3.
This tutorial is written to be very simple, there is no advanced voodoo magic you need to learn just the plain and simple, most simplest of ways to get terrain created and brought in-game. We will have more advanced stuff elsewhere in PMC Editing Wiki so use the search function.
Required Tools
You need a good text editor, image editor, Mikero Tools, L3DT and obviously steam arma3 tools.
Do not ever use windows notepad or wordpad to edit text files. Recommended text editors listed at Editing Tools: Text Editing.
Most arma3 modders use Photoshop or GIMP to edit their images. GIMP is free, photoshop is not. You can check full list of image editors in Editing Tools: Image Editing.
Mikero Tools are required for all kinds of arma3 related editing.
L3DT is used in this tutorial to create three different sets of files (more about it later).
This tutorial was written (heh) with EditPad Pro and all image editing in the tutorial is done with Photoshop CS6 64bit.
Note: Addon Builder should not be used to binarize and pack your addon because it does not work properly, it has problems binarizing RVMAT files and textures used from configs. Experienced community members jokingly have named Addon Builder a “Addon Breaker”. Do not use it, use Mikero Tools pboProject instead (we'll cover this in Binarization part).
Installing L3DT
You'll find download link from our ArmA 2 Terrain: L3DT page. That page is just a reference, you don't need to read it through for this tutorial.
Installing using the L3DT installer is easy. At 2019-01-02 L3DT is freeware L3DT news, there are v16.05 and development v18.08 Pro downloads available. This tutorial uses v16.05 (but you should be fine with the development version as well).
This tutorial is written with heightmaps and satellite texture/masks of small 2048 grid/resolution just for tutorial purposes to make the files quicker to process. You cannot make proper arma3 terrain SATELLITE TEXTURES with 2048 resolution images. For reference (but you don't have to read this now) satellite image resolution size explained covers how small or large satellites you need on difference sizes of terrains.
Installing Mikero Tools
Basic installation guide at Mikero Tools page.
You must install Mikero tools in order to get terrain properly in-game.
Installing ArmA 3 Steam Tools
Guide on Installing Steam ArmA 3 Tools and Setup P: Drive.
Do not skip setting up P: drive properly, wrongly setup or missing P: drive is the most common cause of issues when developing addons.
Configure Terrain Builder
We are not ready to do any terrain work yet, first we need to configure terrain builder.
Start up terrain builder and then follow the buldozer configuration guide in ArmA 3 Buldozer page regarding terrain builder.
It is fairly easy, you can pretty much copy paste the launch parameters line from there. You also need to add .exe file path, this would be:
<steamPath>\SteamApps\common\Arma 3\arma3_x64.exe
Where you again replace <steamPath> with your own steam library path where you installed steam arma 3 tools.
Build Environment
Back in ArmA (Armed Assault) times Synide created excellent tutorial about ArmA Build Environment. Now that tutorial of course is for arma but you need to read it to understand how the basics of addon building environment works. Do not follow that tutorial but read it as reference reading to expand your arma build environment knowledge.
Choosing Your TAG
First you need to select a TAG for your project / namespace, this is something obvious like abbreviation of your group or name. For us here at PMC sekret kodelabs its obviously just our organization name “PMC”, so our tag in full is “PMC_” and all addons out there in the wild you see tagged PMC_ are ours.
You obviously cannot use other peoples tag, so good place to check if tag exists is ofpec.com/tags.
In this tutorial we use “TUT” tag for “tutorial” to make things easier to understand, but when you plan on releasing any addons to the community, you must use your own TAG_ name. So basically your chosen TAG name has no use in this tutorial, its just very important to understand the meaning of addon TAGs.
Create namespace (TAG) to P: drive with it. So the path would be:
tut\
and in P: drive it would become with full path to:
p:\tut\
This is your namespace or prefix, there is not going to be any addon files that arma 3 tools read, only directories.
In the tut namespace you create directory lets say tut_tutorial_terrain so it would be:
tut\tut_tutorial_terrain\
and you already know how it looks with full P: drive path:
p:\tut\tut_tutorial_terrain\
Browse to \tut\tut_tutorial_terrain\ and create directory “Source” there, so it will become:
\tut\tut_tutorial_terrain\source\
Now create file name “$PBOPREFIX$” in this directory, so it will become:
\tut\tut_tutorial_terrain\$PBOPREFIX$
Now open $PBOPREFIX$ in text editor and write the following line there:
tut\tut_tutorial_terrain
This is your namespace \ addon name directory, pboprefix file tells arma3_x64.exe where this addon's files can be found. It is very important to use $PBOPREFIX$ do not skip it, this is how proper addons are done.
Next we will have to download maplegend.png file. This file is used by terrain builder in various satellite things, you can download it from the below link (for example open to a new browser tab and save as).
Place Maplegend.png image to your P:\ root dir. Make it “maplegend.png” file name. So it would be:
p:\maplegend.png
NOW we are finally done with the build environment for our project :)
Layers.cfg
Layers.cfg is a file that Terrain Builder uses to setup Ground Detail Textures (GDT).
Browse to \tut\tut_tutorial_terrain\source\ directory and create a “layers.cfg” file there, open it in text editor and copy paste this:
class Layers
{
	class tut_grass_green
	{
		texture = "";
		material = "tut\tut_tutorial_terrain\data\tut_grass_green.rvmat";
	};
};

class Legend
{
	picture = "maplegend.png";

	class Colors
	{
		tut_grass_green[] = {{ 230, 230, 120 }};
	};
};
Ground Detail Textures
Ground Detail Textures (GDT) are more detailed than satellite texture, these textures appear close around your character. Further out the satellite texture kicks in.
Browse to \tut\tut_tutorial_terrain\ and create a new directory called “Data”, so it becomes:
\tut\tut_tutorial_terrain\data\
Create a “tut_grass_green.rvmat” file there, open it in text editor and copy paste this:
ambient[] = { 1, 1, 1, 1 };
diffuse[] = { 1, 1, 1, 1 };
forcedDiffuse[] = { 0.02, 0.02, 0.02, 1 };
specular[] = { 0, 0, 0, 0 };
specularPower = 1;
emmisive[] = { 0, 0, 0, 0 };

PixelShaderID = "NormalMapDiffuse";
VertexShaderID = "NormalMapDiffuseAlpha";

class Stage1
{
	texture = "a3\map_data\gdt_grass_green_nopx.paa";
	uvSource = "tex";
	class uvTransform
	{
		aside[] = { 10, 0, 0 };
		up[]    = { 0, 10, 0 };
		dir[]   = { 0, 0, 10 };
		pos[]   = { 0, 0, 0 };
	};
};

class Stage2
{
	texture = "a3\map_data\gdt_grass_green_co.paa";
	uvSource = "tex";
	class uvTransform
	{
		aside[] = { 10, 0, 0 };
		up[]    = { 0, 10, 0 };
		dir[]   = { 0, 0, 10 };
		pos[]   = { 0, 0, 0 };
	};
};
What the above along with layers.cfg is doing is to show a3\map_data\gdt_grass_green_co.paa texture around your character on the ground.
In this tutorial example we are using only one texture to keep it simple, but normal terrains use more, dozens more of these textures. You don't have to worry about that now.
In our layers.cfg we reference to tut_grass_green.rvmat material file, which again references to the actual texture found in a3\map_data\ directory. This is kind of cool that our terrain doesn't need any actual texture files in its pbo, it only references them from another pbo.
Heightmap
Heightmap or heightfield or terrain elevations whatever you want to call this is what makes your “terrain” look like, well terrain.
In this example we use L3DT to create heightmap terrain elevations.
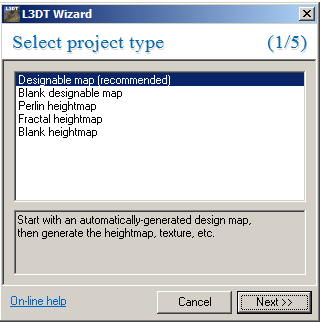
Start L3DT and click create a new project or hit CTRL-N
Click next (designable map)
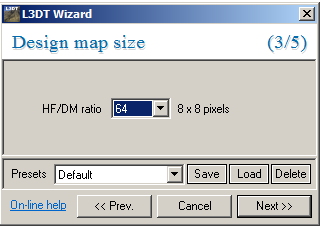
Change width/height both to 512 and click next
Click next (design map size)
Design map parameters are easiest to leave default for our tutorial purposes, click next
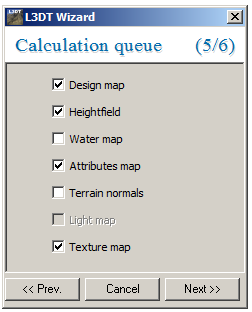
Tick to enable; heightfield, attributes map and texture map, click next (button turns from OK to next)
Texture settings untick “use light map” and click ok
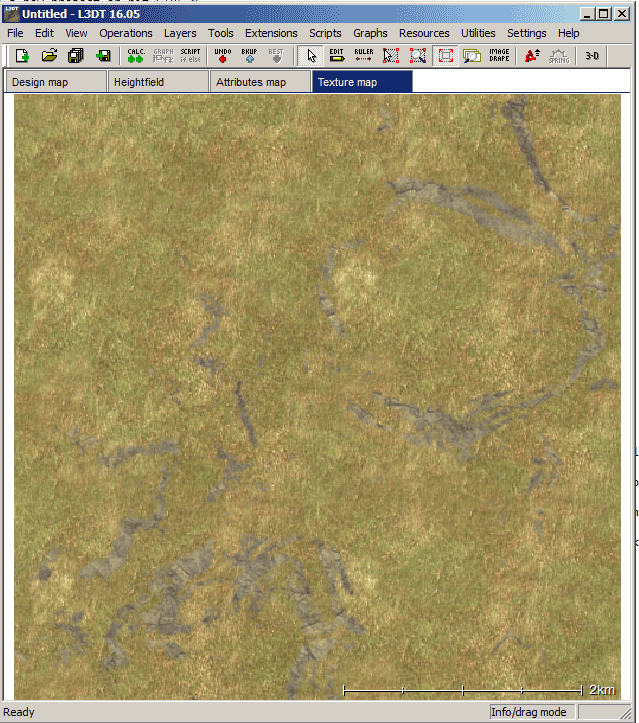
Now L3DT is processing! wait until its done
CTRL-S to save the project, browse to \tut\tut_tutorial_terrain\source\ give file name of “tut_tutorial_project”, click save and ok
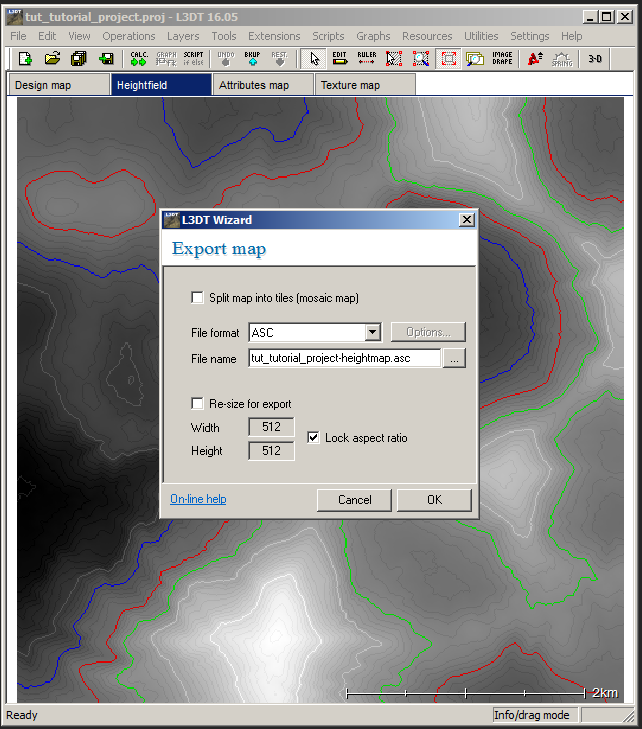
Select heightfield tab, use CTRL-E to export
Export map select file format ASC, and to file name field type: tut_tutorial_project-heightmap, click ok and click ok
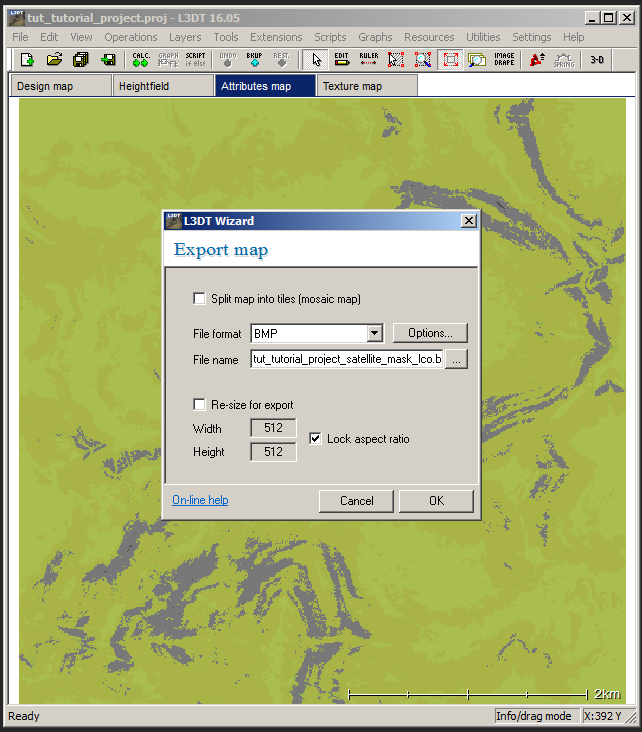
Select attributes tab, use CTRL-E to export
Export map select file format BMP, and to file name field type: tut_tutorial_project_satellite_mask_lco, click ok and click ok
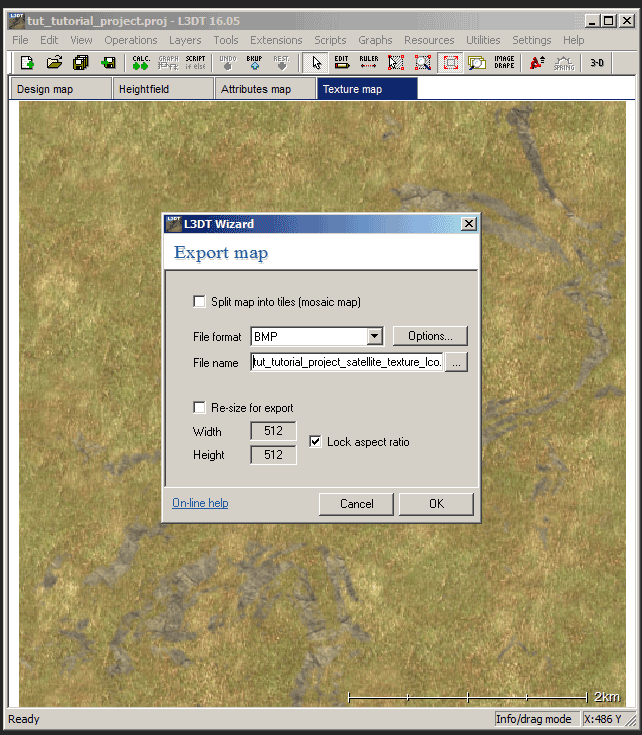
Select texture map tab, use CTRL-E to export
Export map select file format BMP, and to file name field type: tut_tutorial_project_satellite_texture_lco, click ok and click ok
Save project and exit L3DT
Open ASC heightmap “tut_tutorial_project-heightmap.asc” in text editor and edit the first lines identical to these:
ncols         512
nrows         512
xllcorner     200000.000000
yllcorner     0.000000
cellsize      10.000000
Basically you only change the xllcorner value to 200000.
Your heightmap / heightfield is now done. Also your satellite mask and texture is done, but don't worry about those now.
Terrain Builder
Now we are using Terrain Builder to compile your terrain source files together.
Initial Project Setup
Open terrain builder and choose mapframes → add mapframe
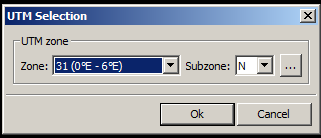
UTM selection click ok
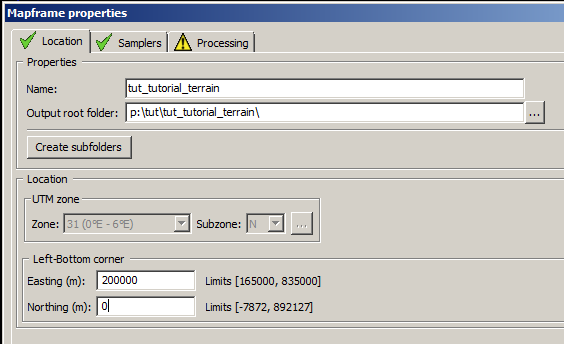
Mapframe Properties select location tab
Properties, type in name: tut_tutorial_terrain
Properties, output root folder (dir), use “…” button to browse: p:\tut\tut_tutorial_terrain\
Properties, click create subfolders button, click ok
Location, left-bottom corner, set easting to 200000 and northing to 0
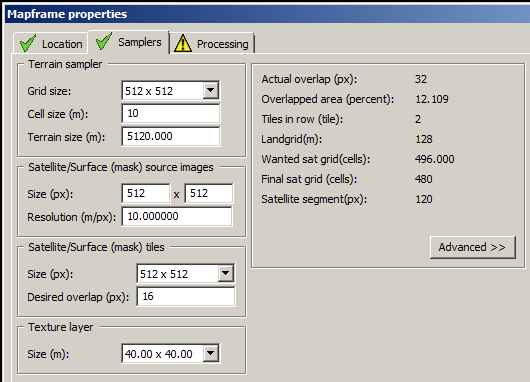
Select samplers tab
Terrain sampler → grid size 512 x 512, cell size 10
Satellite/surface mask source images → size (px): 512
Texture layer → size (m): 40 x 40
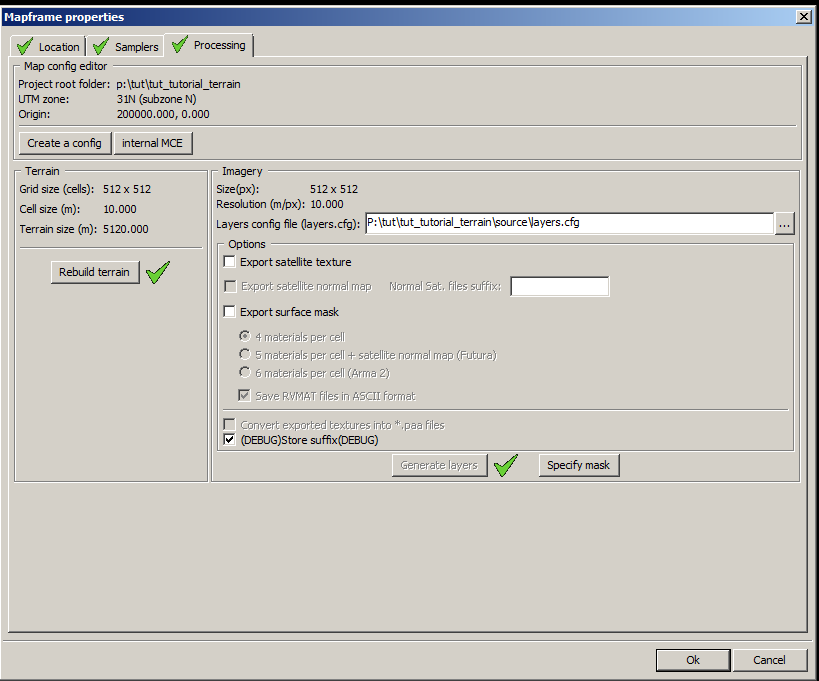
Select processing tab
Use “…” button to browse into your p:\tut\tut_tutorial_terrain\source\layers.cfg file
Click rebuild terrain button, click yes
Mapframe properties, bottom right, click ok
On main menu make sure “view mapframes”, “view terrain heightmap”, “view satellite image” and “view surface mask image” buttons are selected.
Use file → save project, into \tut\tut_tutorial_terrain\source\TerrainBuilder\ directory, file name tut_tutorial_terrain.tv4p
Importing Terrain
Use file → import → terrains, browse to \tut\tut_tutorial_terrain\Source\tut_tutorial_project\ and open tut_tutorial_project-heightmap.asc
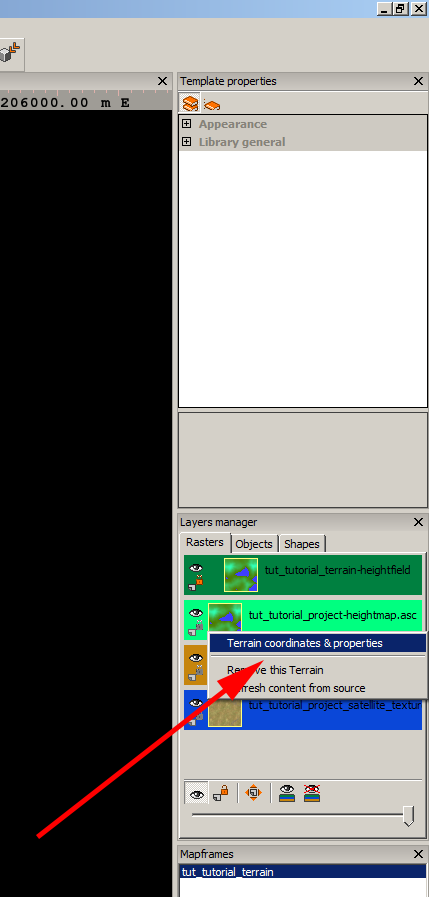
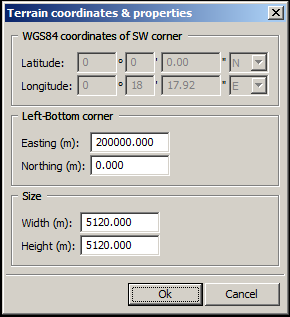
Layer manager → tut_tutorial_project-heightmap.asc → RMB → terrain coordinates and properties
Type easting 200000 and northing 0, click ok
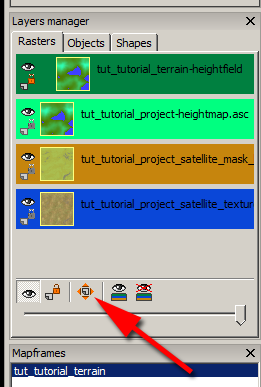
The terrain most likely disappears from view, so on layers manager click fit to view button.
Now use mapframe properties → processing → rebuild terrain, this button actually generates the terrain into your project, previously you just imported the heightmap ASC. Don't forget to use rebuild terrain button.
Importing Satellite Mask
- use file → import → surface mask images, browse to \tut\tut_tutorial_terrain\Source\tut_tutorial_project\ and open tut_tutorial_project_satellite_mask_lco.bmp
- layer manager → tut_tutorial_project_satellite_mask_lco → RMB → terrain coordinates & properties
- make sure easting is 200000, northing 0 and size width/height is 5120 (and NOT 512.000 this is very important difference), click ok
Again click fit to view to see your newly imported mask image.
Importing Satellite Texture
- use file → import → satellite images, browse to \tut\tut_tutorial_terrain\Source\tut_tutorial_project\ and open tut_tutorial_project_satellite_texture_lco.bmp
- layer manager → tut_tutorial_project_satellite_texture_lco → RMB → terrain coordinates & properties
- make sure easting is 200000, northing 0 and size width/height is 5120 (and NOT 512.000 this is very important difference), click ok
Now its good idea to save your project.
Generating Texture Layers
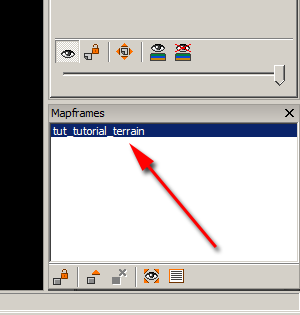
On mapframes dialog seen below:
Double click on “tut_tutorial_terrain” your only mapframe. You can also RMB click it and choose properties, but double click is quicker.
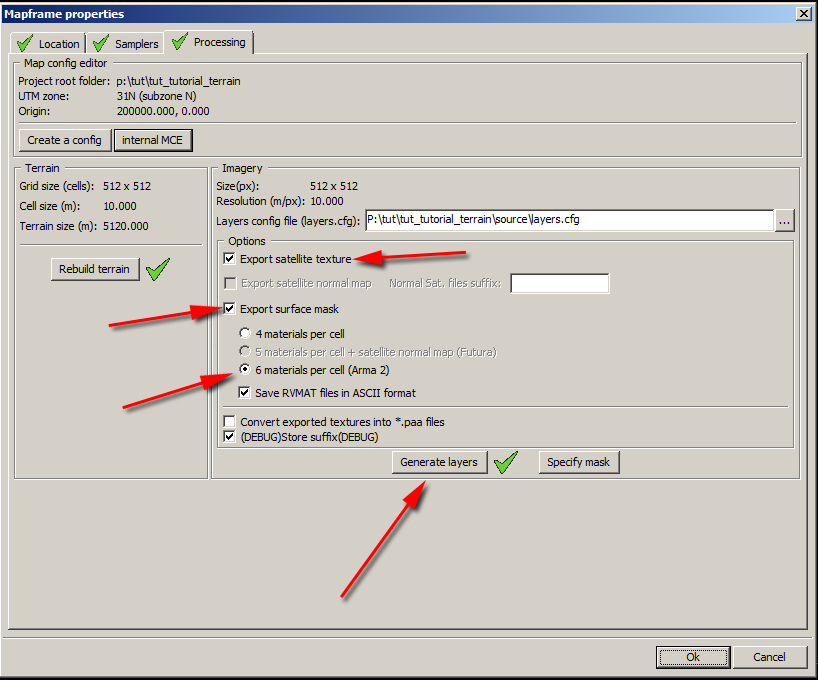
Select processing tab
Tick export satellite texture
Tick export surface mask
Make sure “6 materials per cell (arma 2)” and save rvmat files in ASCII format are selected
Click generate layers button and wait…
Waiting time is practically none because your satellite texture/mask is so tiny (512 x 512 resolution). In future when you increase your satellite resolution, this generating of layers time will increase quite much, so don't get used to this very quick generate layers setup.
Now terrain builder generated \tut\tut_tutorial_terrain\data\layers\ directory full of rvmat's and PNG images. In our small tutorial its only four of each, on normal terrains this number can rise as high as thousand when the satellite resolution is increased.
Now you can click mapframe properties ok to close it, then save your project again.
Convert Layers PNG Fast
Next we need to convert layers\*.png files to PAA image format. In our example case we could use terrain builder built in feature, however it is essential that we learn how to convert them fast right from the beginning. Once you start to edit larger terrains (larger satellites) you'll understand why this is so important.
Convert Layers PNG Fast tutorial shows you how to setup this batch file.
Browse to \tut\tut_tutorial_terrain\data\ directory and RMB create new text file, name it “_run_png2paa-start.bat”
Open _run_png2paa-start.bat in text editor and copy paste the code from Convert Layers PNG Fast.
Now just run the _run_png2paa-start.bat batch file and see those PNG's get converted to PAA's very quickly. Super quickly in fact with our tutorial case, but like said don't pay no mind to that now, you'll thank me later :)
Buldozer Preview
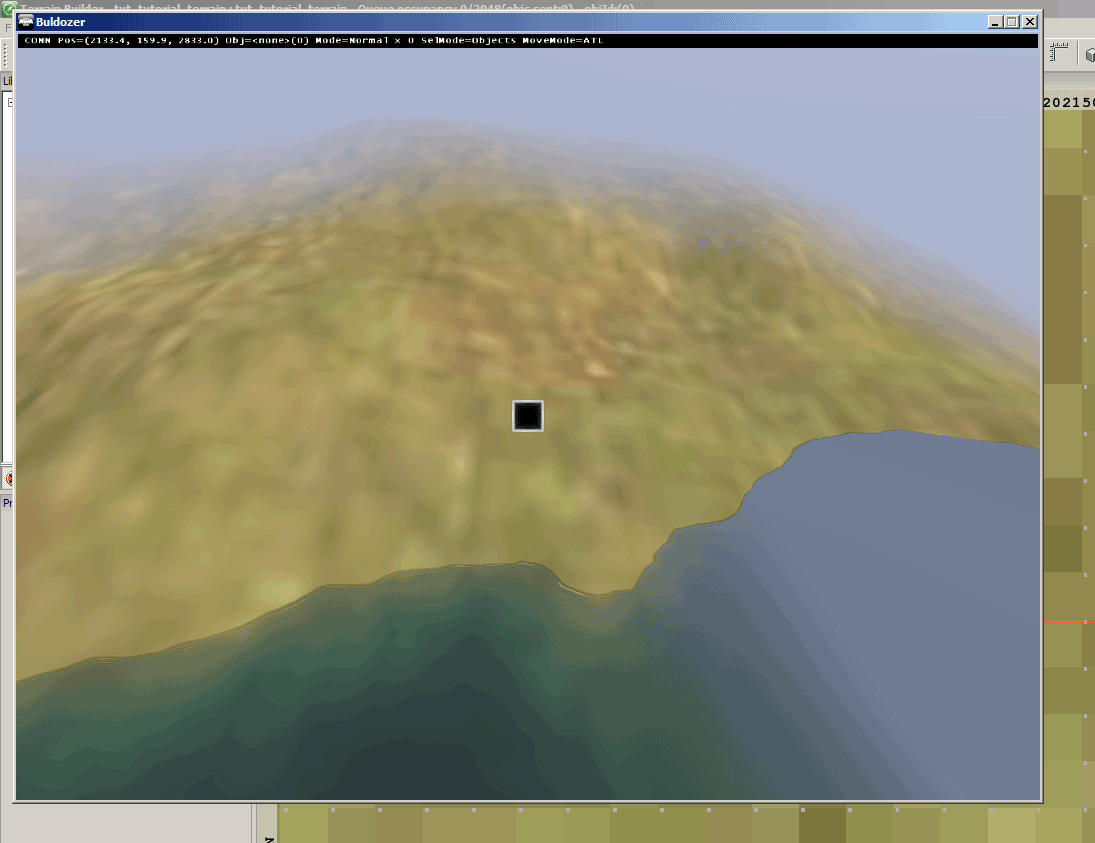
Now you are ready to view your terrain the first time, not in-game but in the next best thing; the buldozer.
To start buldozer click the “connect to buldozer” button in main menu.
Now your buldozer will start and if you have configured terrain builder correctly and your P: drive is setup properly, you'll see your terrain in buldozer window.
Buldozer view, your looks different of course.
You can browse around in your terrain, check out buldozer controls keyboard shortcuts for navigation help.
Like the controls page says, exit buldozer by hitting ALT-F4 or you can click “connect to buldozer” button again which actually this time says “disconnect from buldozer”. Although I think most devs just hit ALT-F4 to quickly shut buldozer down, in any case you get another dialog asking for confirmation.
Export WRP
Now that your terrain is working in buldozer, it is time to export the actual WRP file that arma3_x64.exe reads.
Use CTRL-E or file → export → WRP, browse to \tut\tut_tutorial_terrain\ directory and give file name “tut_tutorial_terrain.wrp”, click save.
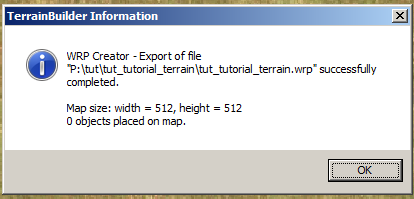
You'll see terrain builder information dialog about status of your exported WRP file, it in our tutorial case says map size 512 and 0 objects placed on map.
Click ok.
Now you can (check that you have saved your project, just in case) close the project, file → close, then file → exit (doh!) to shut terrain builder down.
Now you have new file in the your addon root directory:
\tut\tut_tutorial_terrain\tut_tutorial_terrain.wrp
Config.cpp
Config, oh wow, this is going to be a mouthful :)
Config.cpp is located in the root directory of your addon, right next to a $PBOPREFIX$ file. So lets create it now, file name is always “config.cpp”. Open this file with your text editor and copy paste the following.
config.cpp:
class CfgPatches
{
	class tut_tutorial_terrain
	{
		units[] = {};
		weapons[] = {};
		requiredVersion = 1;
		requiredAddons[] =
		{
			"A3_Map_Stratis"
		};
	};
};

class CfgWorldList
{
	class tut_tutorial_terrain{};
};

class CfgWorlds
{
	class Stratis;
	class tut_tutorial_terrain: Stratis
	{
		cutscenes[] = {};
		description = "TUT Tutorial Terrain";
		worldName = "\tut\tut_tutorial_terrain\tut_tutorial_terrain.wrp";
		author = "PMC";
		icon = "";
		previewVideo = "";
		pictureMap = "";
		pictureShot = "";

		newRoadsShape = "";

		centerPosition[] =
		{
			2560, 2560
		};
		ilsDirection[] =
		{
			0, 0.08, 1
		};
		ilsPosition[] =
		{
			0, 0
		};
		ilsTaxiIn[] = {};
		ilsTaxiOff[] = {};
		drawTaxiway = 0;
		class SecondaryAirports{};
		class ReplaceObjects{};

		class Sounds
		{
			sounds[] = {};
		};

		class Animation
		{
			vehicles[] = {};
		};

		minTreesInForestSquare = 2;
		minRocksInRockSquare = 2;

		class Subdivision{};
		class Names{};
	};
};
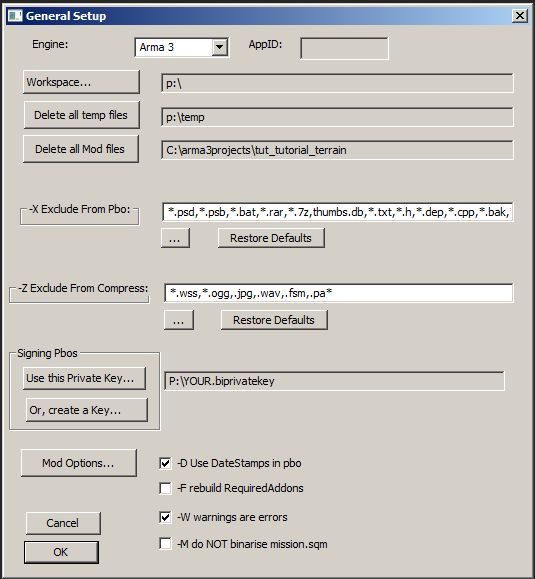
Important note: if you use pboProject later than v1.73 you must start the GUI, go to Setup and untick “-W warnings are errors” tick box. If you do not, this example config.cpp gives error and pboproject fails to pack a pbo. The error you would get is “warning:cfgSurfaces not defined” and “<namespace>\<addon>\config.cpp: there are clutter errors in the config”.
Binarization
pboProject does binarization and packing of your addon to a pbo.
Before you can binarize you have to setup destination mod directory. Go to whatever directory you like to place your mods, then create new directory there. On this tutorial purposes we call it (you guessed it!) “tut_tutorial_terrain” but as you must know(?) you can use any dir name you want. In this example we use “c:\arma3projects\tut_tutorial_terrain\” directory. This is now your “destination mod dir”.
Note: you don't have to create “addons” directory because pboProject does that automatically for you.
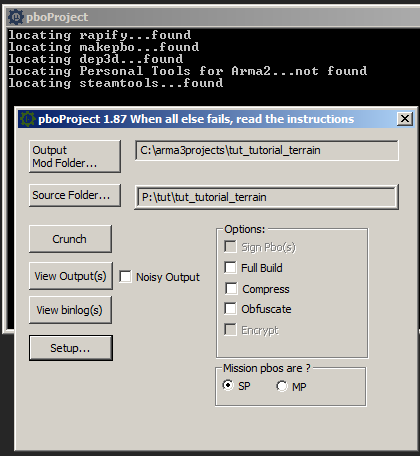
Launch pboProject from Mikero Tools.
Click Setup, check that engine drop down is for “Arma 3”, every other config should be fine as default (you just installed Mikero Tools, right?).
Here is full exclude from pbo line that PMC uses:
*.psd,*.psb,*.bat,*.rar,*.7z,thumbs.db,*.txt,*.h,*.dep,*.cpp,*.bak,*.tga,*.png,*.log,*.pew,*.hpp,source
Click ok to get back to main menu.
Click Output mod folder button and browse to the destination mod dir you just created.
Click Source folder button and browse to P:\tut\tut_tutorial_terrain\ directory. Yes it must be on the P: drive.
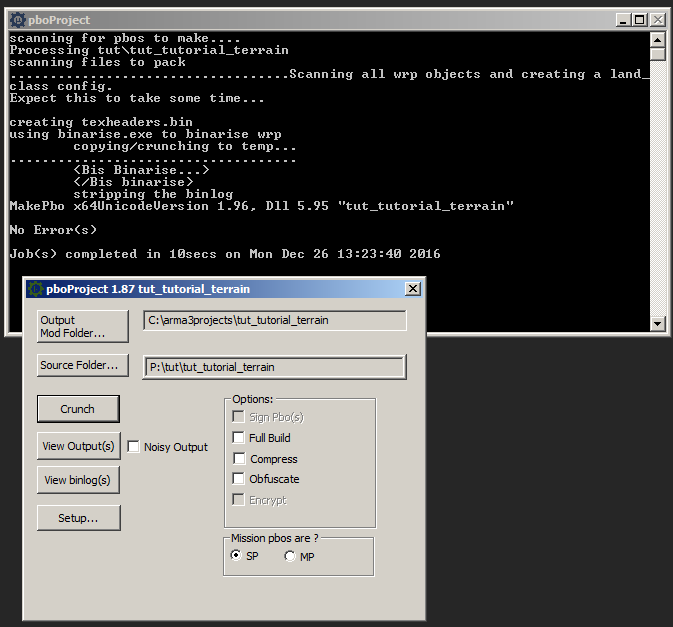
Finally click Crunch button to start binarization. If all goes well pboProject should say:
With your time and date.
Congratulations you have just successfully developed your first ArmA 3 terrain! :)
Now you just load arma3 with destination mod dir and you'll see your terrain in the mission editor menu.
Congratulations
Congratulations of getting your first arma3 terrain working! :)
Now you have the base knowledge how to create source files and put them in-game, however currently your terrain has no objects, its just empty.
Lets continue and add some objects like trees and rocks vegetation stuff there.
Object Library
In order to place objects you need to create an object template library which reads few properties from any added objects.
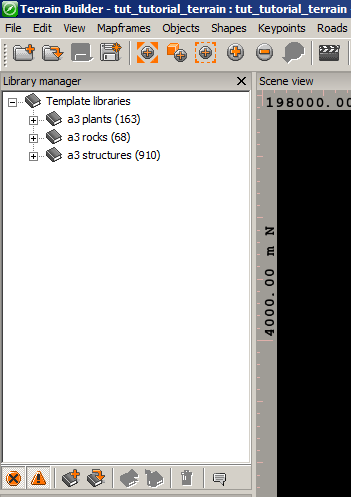
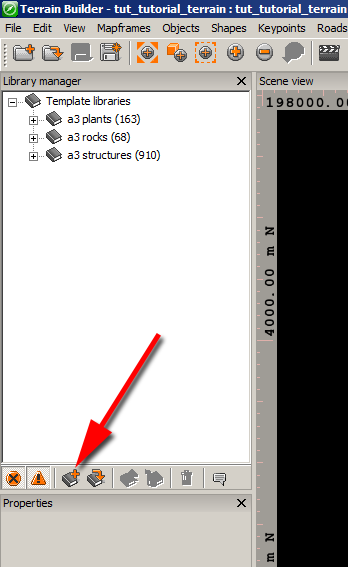
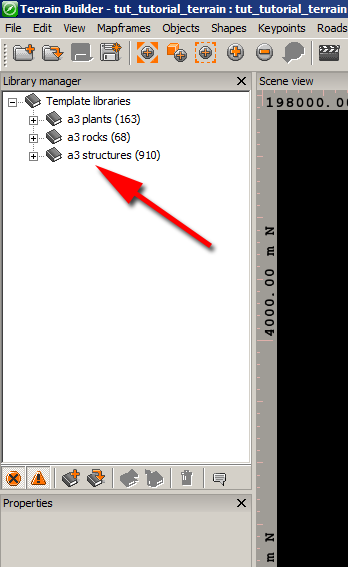
Library manager → template libraries → RMB → create library, or simply click “create new template library” button
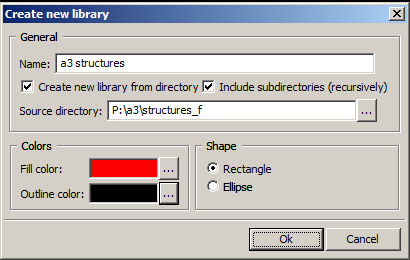
Give the library a name “a3 structures”
Tick “create new library from directory”
Tick “include subdirectories (recursively)“
For source directory use ”…” button to browse into P:\a3\structures_f\
Choose colors fill color: red, outline color: black, shape: rectangle
Click ok
Now “a3 structures” appeared in template libraries.
Next we repeat the same procedure with very minor cosmetic tweaks which make your terrain builder experience that much nicer, bare with me.
- library manager → template libraries → RMB → create library
- give the library a name “a3 rocks”
- tick “create new library from directory”
- tick “include subdirectories (recursively)”
- for source directory use “…” button to browse into P:\a3\rocks_f\
- choose colors fill color: gray, outline color: black, shape: ellipse, click ok
On a3\rocks_f\ you will get some duplicate template names, click “automatically rename all” button, click ok.
Next we create plants vegetation template, using same formula with minor tweaks.
- library manager → template libraries → RMB → create library
- give the library a name “a3 plants”
- tick “create new library from directory”
- tick “include subdirectories (recursively)”
- for source directory use “…” button to browse into P:\a3\plants_f\
- choose colors fill color: green, outline color: black, shape: ellipse, click ok
Library templates created, please save your project.
Your template libraries were saved in \tut\tut_tutorial_terrain\Source\TerrainBuilder\TemplateLibs\ directory as XML file format. This is not required step for you to do, but it might be good idea to backup those .TML files to safe place so you can use them in future terrain projects without going through all the above three steps one by one.
In your possible next terrain project first copy the TemplateLibs\ directory with TML files in it to your Source\TerrainBuilder\ directory, then in Terrain Builder just RMB template libraries and choose load library, then select all TML library files found in the directory. Now you have all those premade libraries available to use. So never delete the created .TML files, they can be very useful in the future.
Object Placement Single
Place Single Objects
On main menu make sure “view scene objects” and “add object” buttons are selected
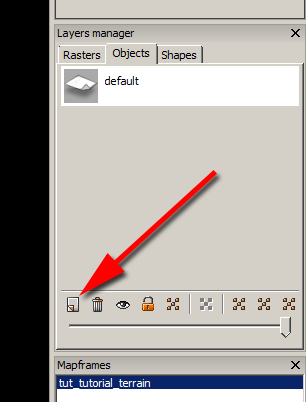
Layers manager select objects tab, click “add new layer” button
Give it name like “rocks 1”, click ok
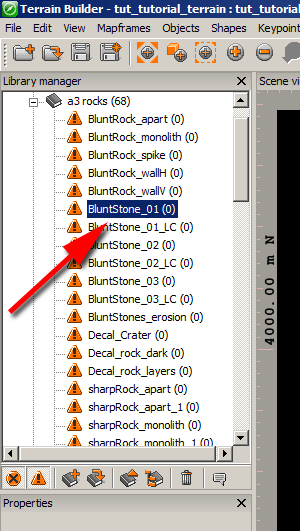
Template libraries → click plus sign on “a3 rocks” to open it
Select lets say “BluntStone_01”
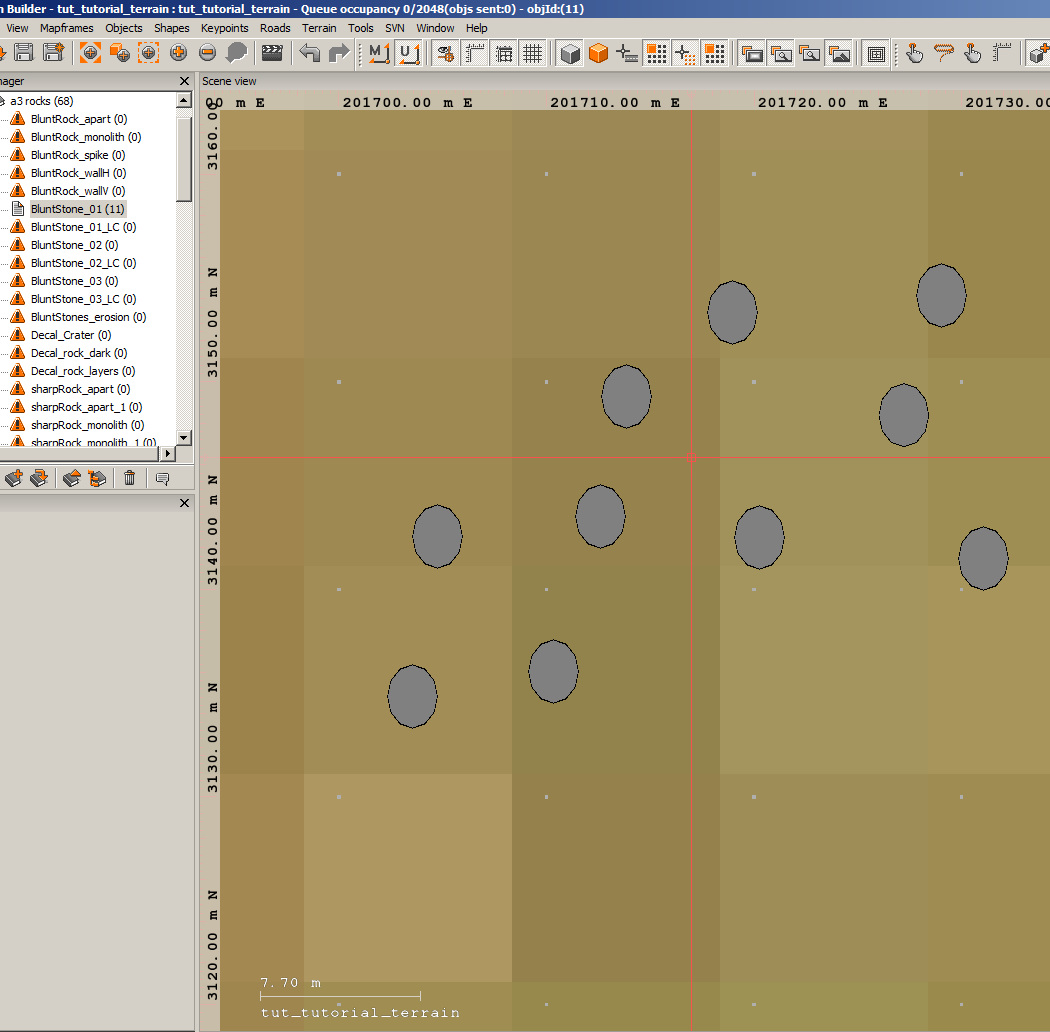
LMB click on the scene view where you want to place this object
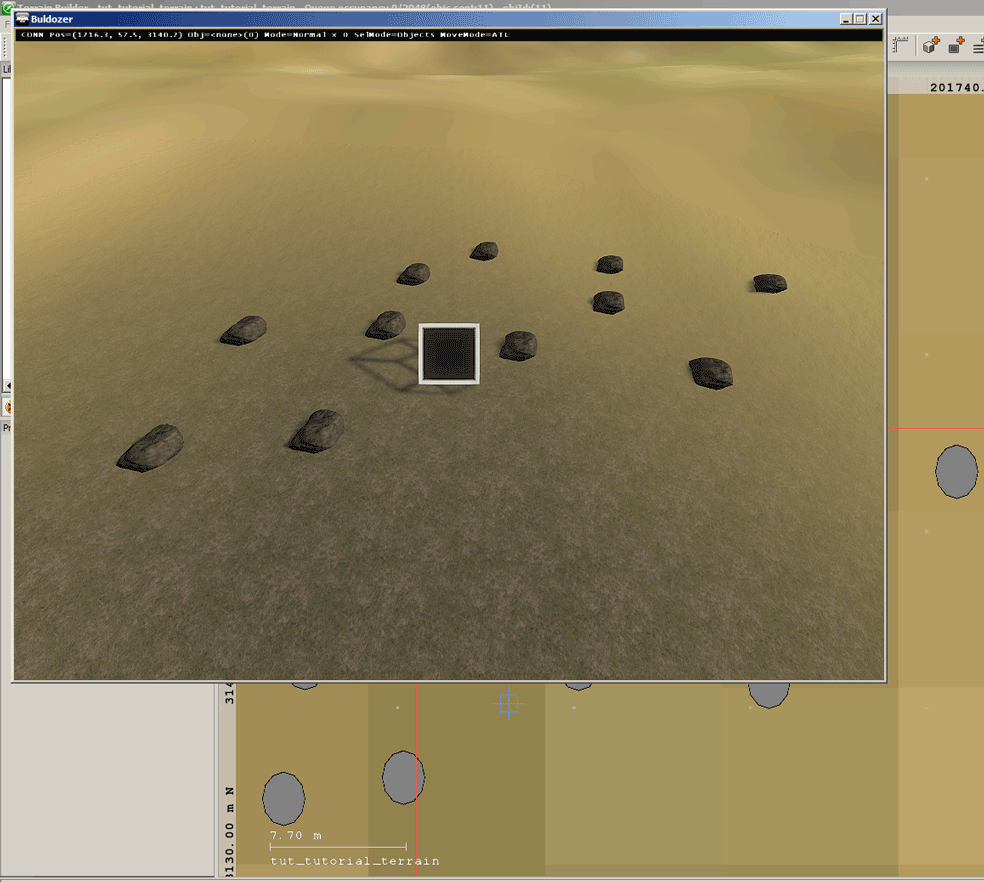
This will place selected object on every LMB click. Notice that you might have to zoom in (mouse wheel) closer to see the placed object as its very small and is “hidden” when zoomed out.
Click connect to buldozer to open it so you can see how your placed objects look in buldozer.
You can select new object from any of the object template libraries and place them as you please.
Remember to unselect “add object” button when you are finished placing objects so your LMB clicks wont place objects.
Select Placed Object(s)
- make sure “add object” button is unselected
- LMB click on object, this selects it and you can see its properties on “properties” (heh) window
Use CTRL-LMB to add objects into the selection, SHIFT-LMB to remove. Drag a box around objects to select many objects at once.
Unselect Object(s)
Just click anywhere on the map (make sure not to click on another object, unless that is what you want to select instead).
Move / Rotate Objects
Once you have selected an object, you can move the object by LMB press & hold and move mouse, release LMB to drop/stop moving the object.
SHIFT-RMB to rotate the selected object(s). Also SHIFT-ALT-RMB and SHIFT-CTRL-RMB rotate object(s) with different axis (you have to experiment yourself to see the effect).
Delete Objects
Select object(s) and hit DEL key, object(s) get deleted. Be careful.
Delete Objects in Layer
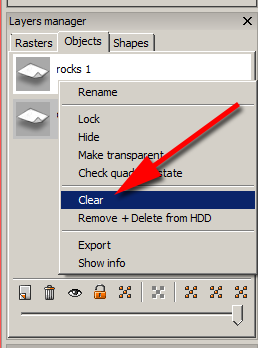
You can also mass delete objects from the layers manager. RMB click on “rocks 1” layer and choose clear.
Click yes button to delete all objects in the “rocks 1” layer.
Delete Layer
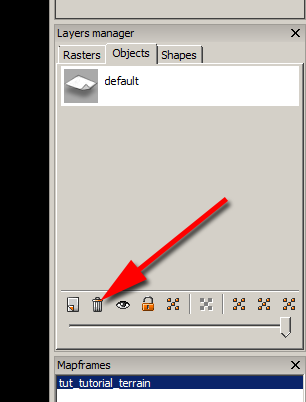
RMB your layer you want to delete and choose “Remove + delete from HDD” or just click the trashcan “remove layer” button.
Layer gets completely deleted. You cannot delete “default” layer shown in the image, only layers created by you.
Object Placement Shapes
Shapes are polygon shapes where objects are placed in mass numbers.
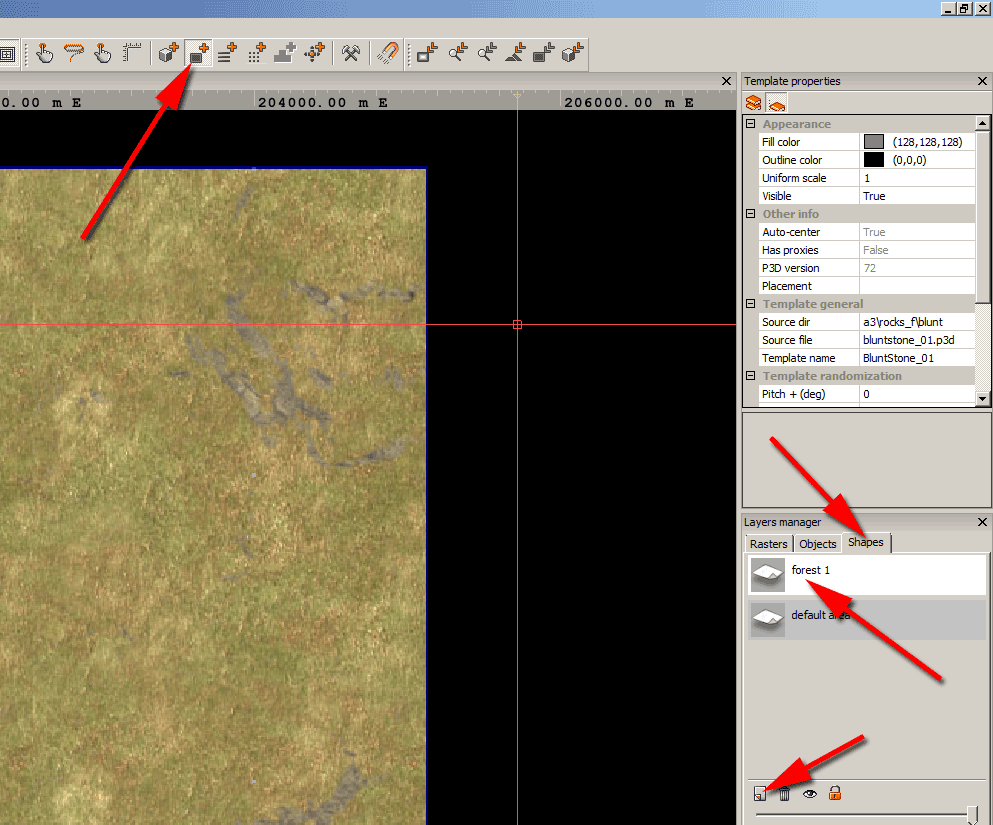
Turn on view shapes button in main menu.
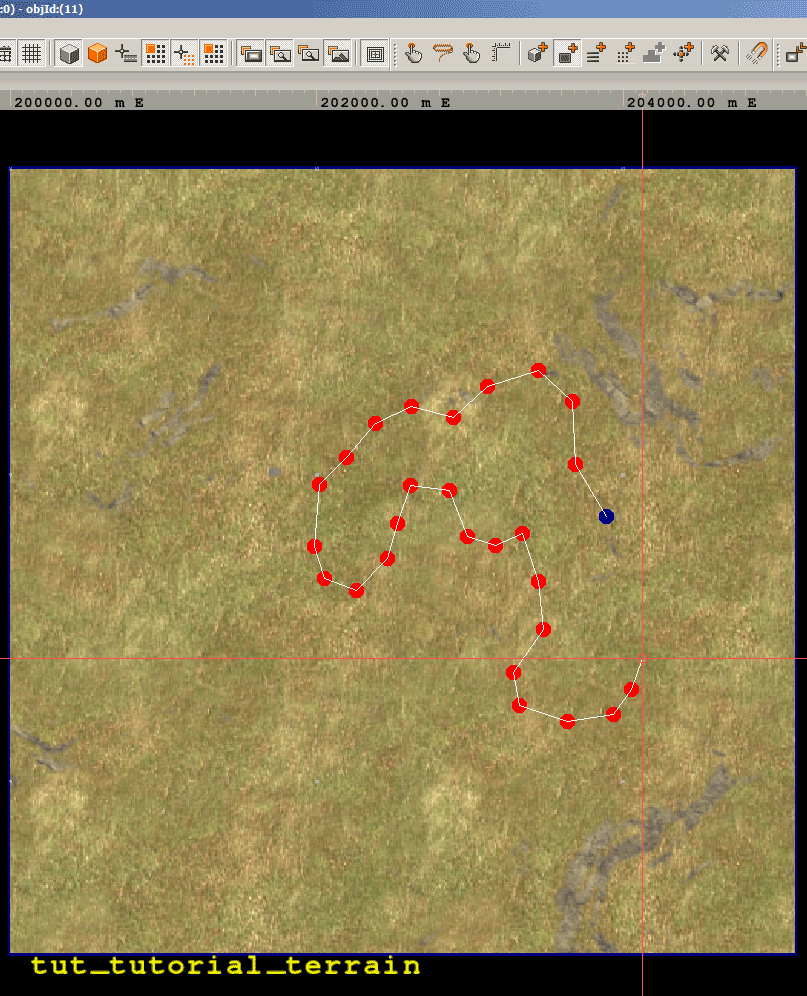
Make sure add polygon button from main menu is selected, you see mouse cursor to change
Layers manager select shapes tab
Click add new layer button button, give it name “forest 1”, click ok
Now LMB click points to scene view to create a polygon
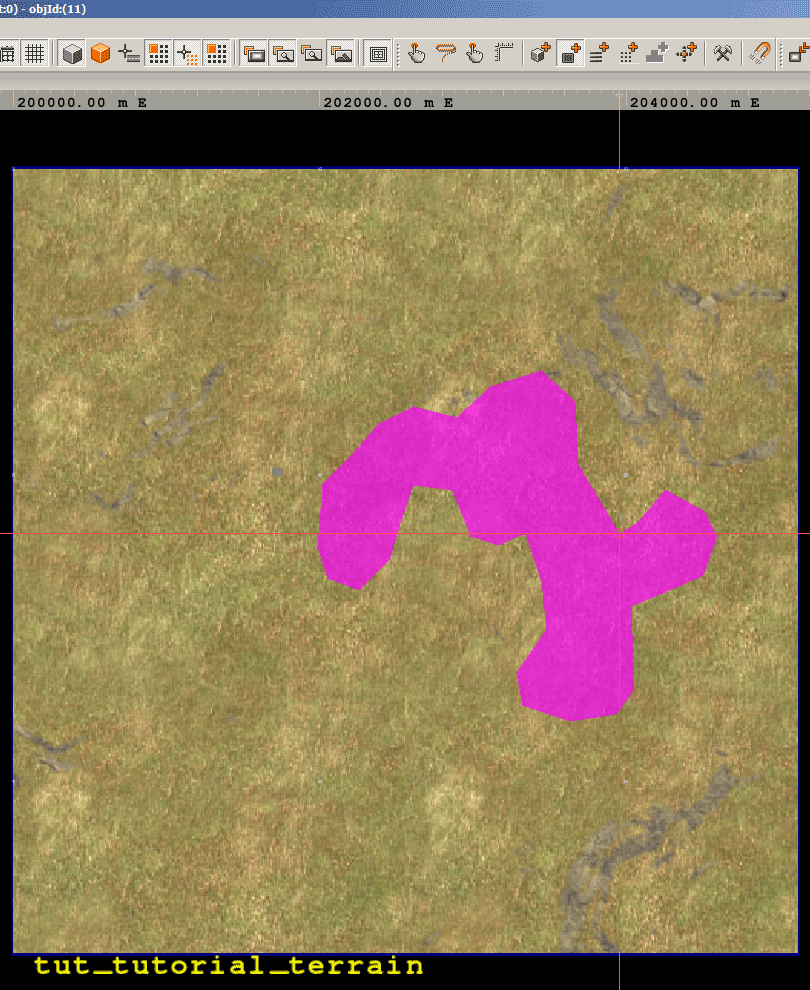
Once you're done double LMB click to close the polygon
Layer manager select objects tab
Add new layer button, give it name “forest 1”, click ok
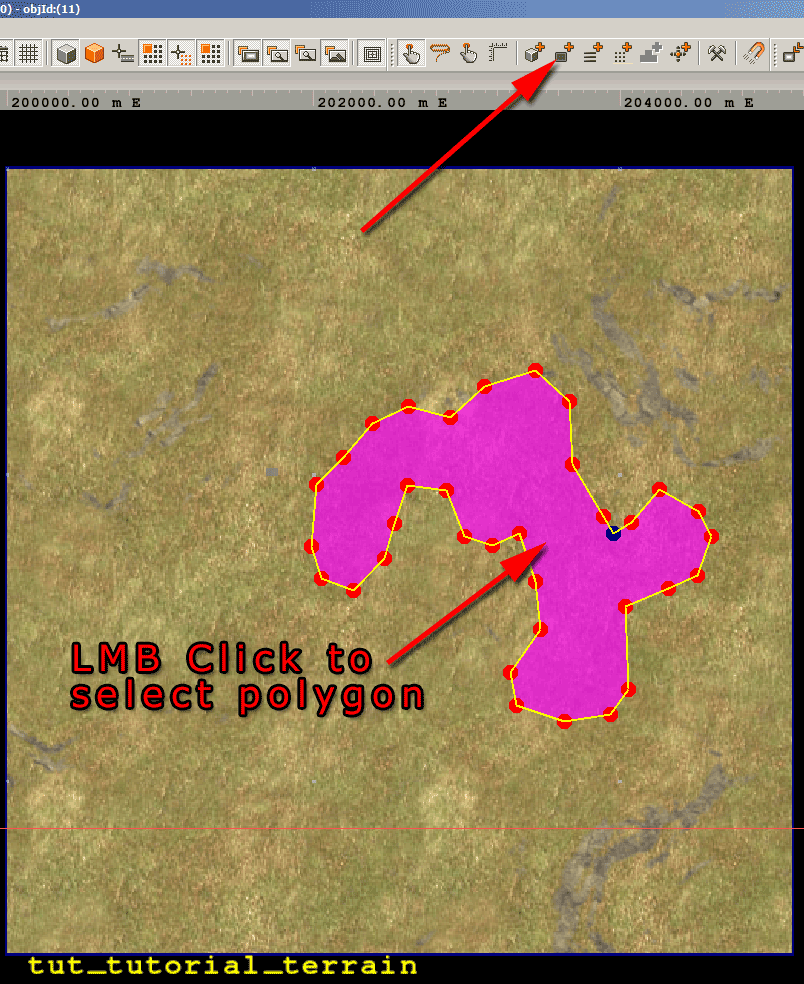
Unselect “add polygon” button
Click to select the polygon in the scene view
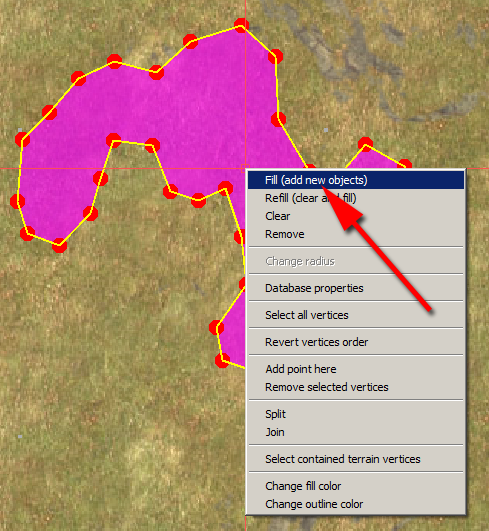
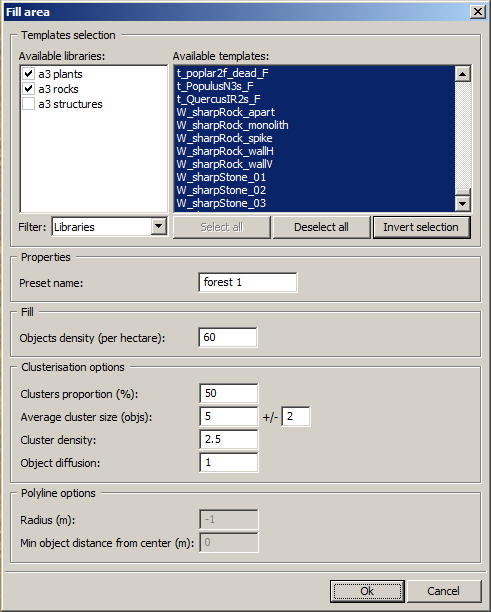
Click RMB → Fill (add new objects)
- fill area dialog select objects, available libraries untick “a3 structures”
- under available templates, click “select all” button
- properties → preset name: add some name like forest 1 etc
- clusterisation options → object density 60
Click ok
Now objects are placed inside your selected polygon. Depending on what kind of settings you used it might take some time or fail completely if the settings are wrong. However with density 60 and others default, it will work just nicely.
While the objects are placed according to your “forest 1” shape layer, the objects are actually placed in the “forest 1” objects layer.
(note the image layer says “rocks 1” instead, no worries)
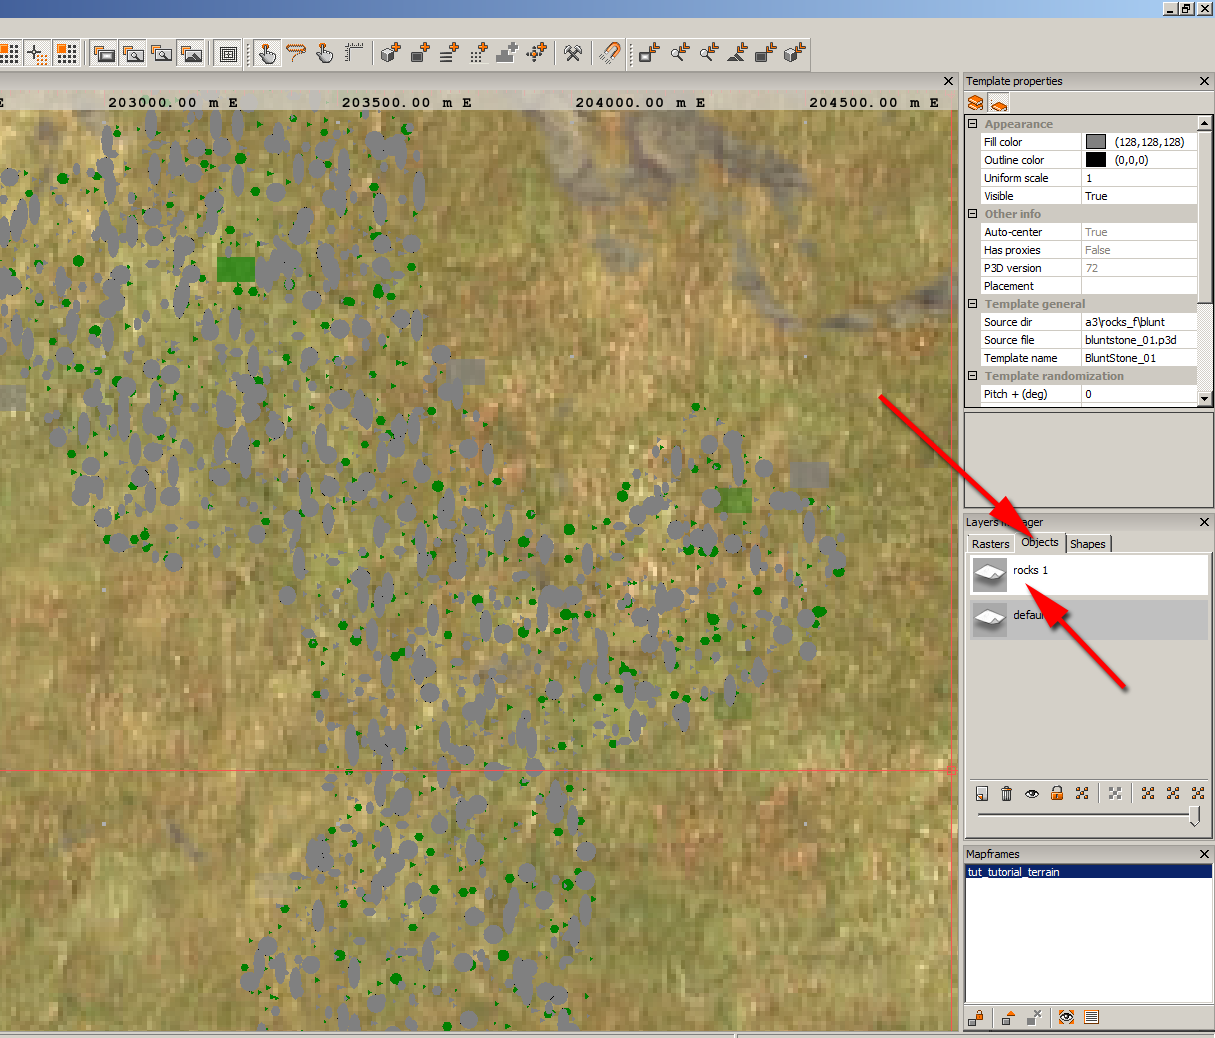
It is important to know the difference between shapes and objects layers. Very tricky :)
Select Shape
Very simple, LMB click shape to select it.
Moving Shapes
Move it by first LMB click to select shape and another LMB click keeping it pressed while moving your mouse. Release LMB to drop shape to a new position.
Delete Shape
LMB click shape to select it, hit DEL key to delete. Be careful.
Or you can delete all shapes in a layer by layers manager → shapes tab → RMB wanted layer in our case “forest 1” and choose “remove”, click yes for confirmation about deleting all linked shapes in the layer.
Terrain Processor
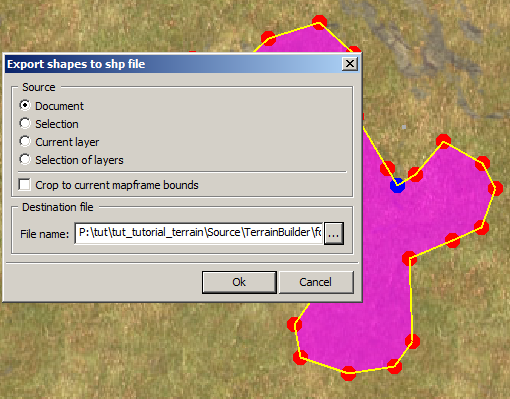
Create some shapes in terrain builder, then export them to be used in terrain processor.
Use file → export → shapes. Source selections are; document is all shapes on the whole project, current layer well current selected layer, selection of layers is all currently selected layers. Pretty obvious stuff except the document.
Destination file use “…” button to browse to Source\TerrainBuilder\ directory and give file name “forest_1.shp”, then click ok to export.
Next you need to create new empty directory, make this as:
\tut\tut_tutorial_terrain\Source\TerrainProcessor\
Open terrain processor and create new project by “create new” button, browse to the new directory you just made, give this project a name of “forest_1.tpp”, so it would be:
\tut\tut_tutorial_terrain\Source\TerrainProcessor\forest_1.tpp
That is not really important which paths and file names you use, but for this tutorial purposes we use those.
Now terrain processor is open and you are ready to setup your project.
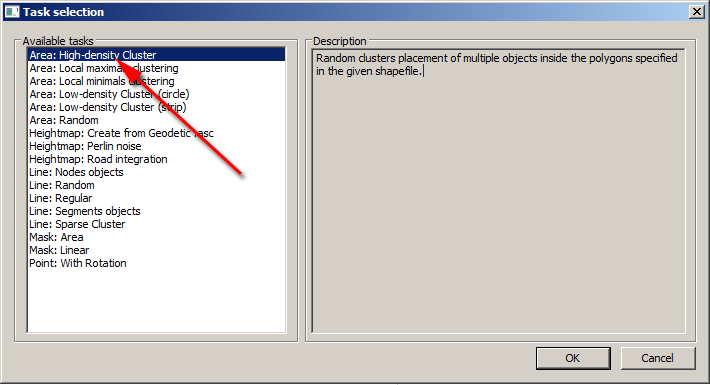
Click “add new task” button.
Select “area: high-density cluster”
Click ok.
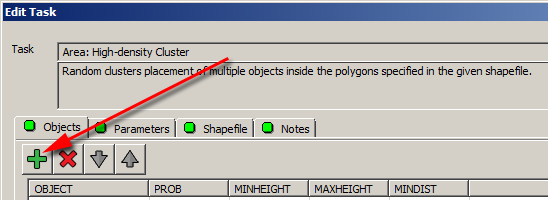
Click green plus button
This adds new object. Click on the “new object name” to edit it and type in lets say “t_FicusB1s_F”.
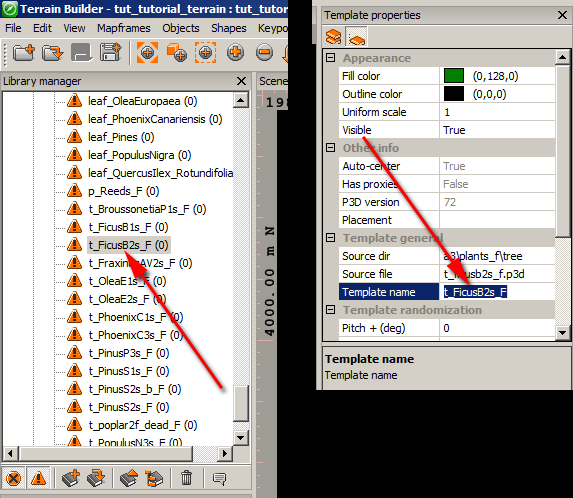
This “t_FicusB1s_F” is a template name from terrain builder, it is basically t_FicusB1s_F.p3d model. You can get those template names from terrain builder, first select an object from library manager, then on the right hand side at “template properties”, “template general” click “template name” and then you can copy to clipboard CTRL-C that template name.
To add that template name to terrain processor, just click on the “New object name” and clear it out, then copy-paste CTRL-V the template name from terrain builder to it. Add what template/p3d names you want to place in this forest 1 polygon shape. You might add couple of rock types and various trees/bushes.
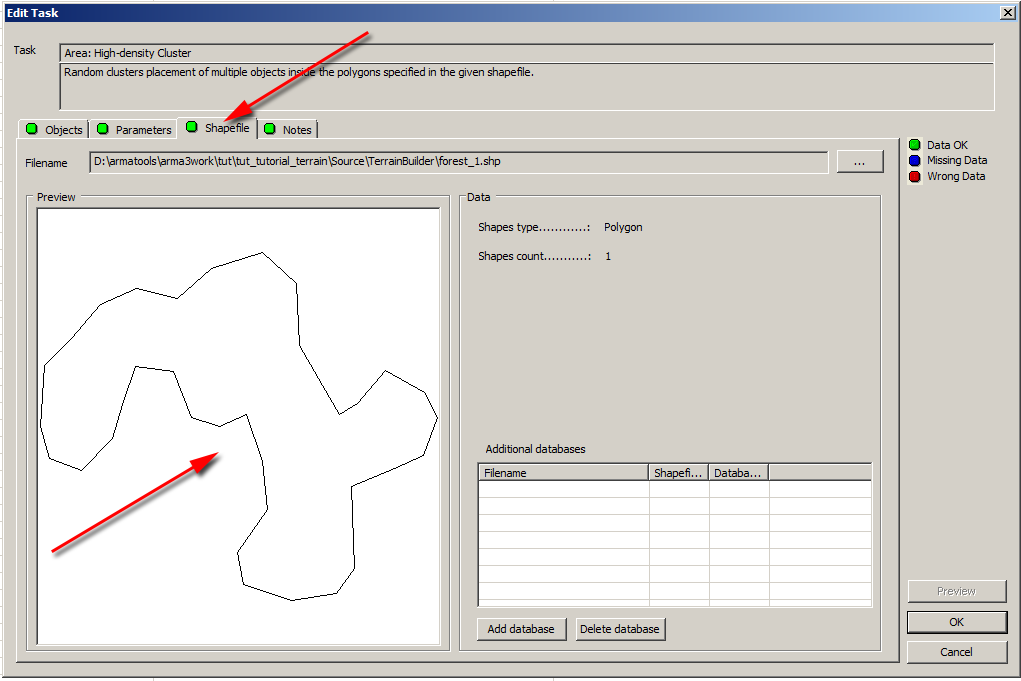
When you are done adding templates/objects, select shapefile tab. Use “…” to browse into “forest_1.shp” file. Click ok.
Save your terrain processor project.
Click “Execute tasks” green run button to start.
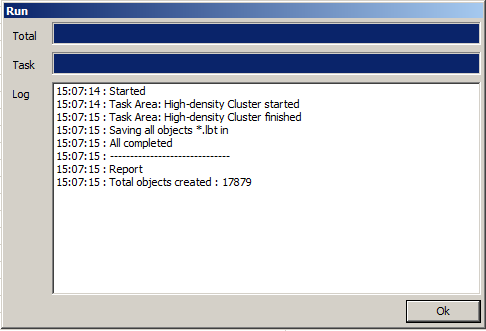
It takes a while depending on how large shape file you have and what kind of settings you used, don't click the ok button, just wait patiently. When terrain processor is done it will clearly say “All completed”.
Please note that if terrain processor freezes or gets stuck, it just remains this way and nothing happens, so while I just said “wait patiently” it doesn't mean you have to wait hours heh. You really need to start with small projects one-step-at-the-time not to get frustrated with terrain processor :)
Anyways in our case terrain processor successfully completed, all good. Click ok to close “Run” window.
It should have now saved “\tut\tut_tutorial_terrain\Source\TerrainProcessor\forest_1.lbt” file.
Open terrain builder and load your project.
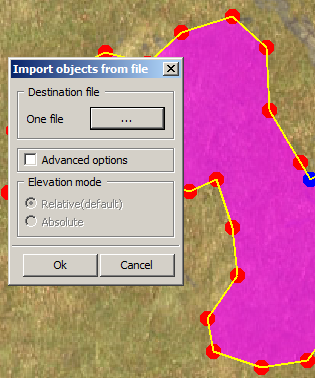
Use file → import → objects, use “pick files” button to browse into “forest_1.lbt” file
Click ok to import. Wait patiently while terrain builder imports, it takes a moment depending on how many hundreds of thousands (heh) objects are you importing.
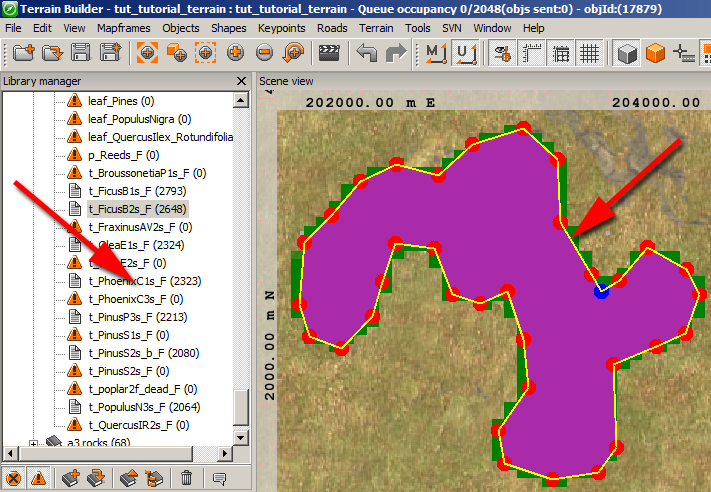
You can see the increased template library objects count after each object placed by terrain processor.
Roads - Create
Roads are created using “polylines”.
Layer manager → shapes, click “add new layer” button, give it name “road 1”, click ok.
On main menu click “add polyline” button so its selected.
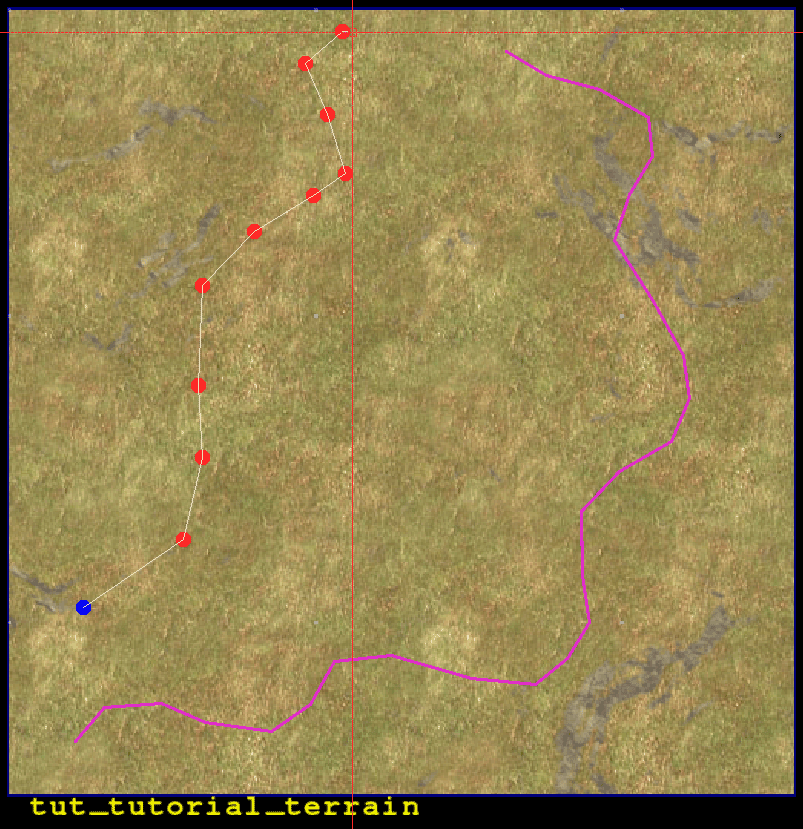
Now go to scene view, use LMB to place dots to create a polyline as a road. When done double LMB click to end the road.
Your first road polyline is done. Now you noticed that polylines do not “close” as they are just lines (not polygons which has to be closed), so you can draw these lines anywhere you want without closing them (you just “end” them).
Edit Polyline (road)
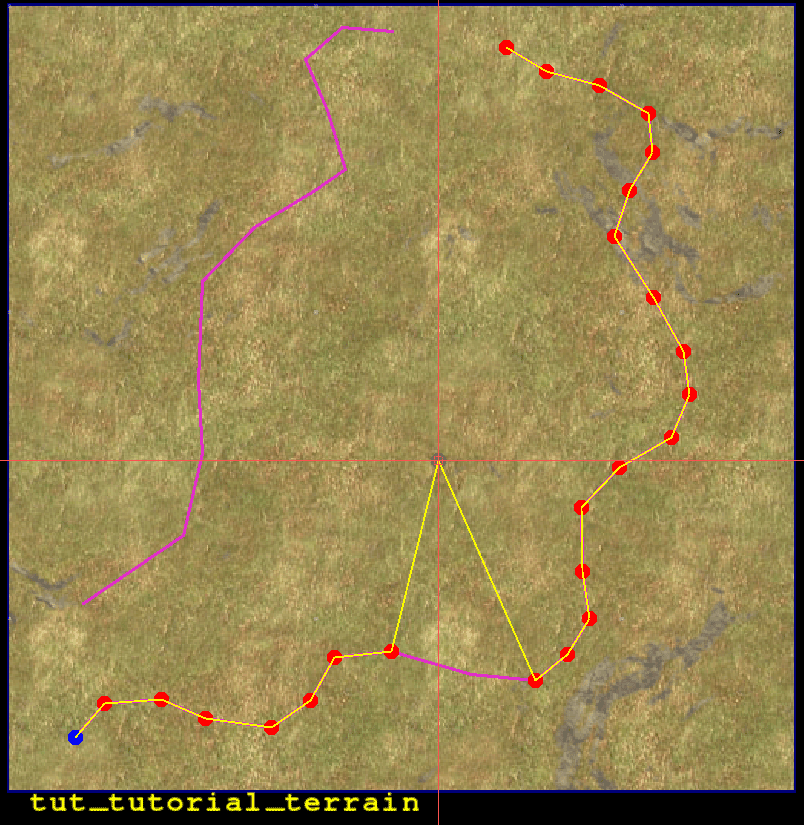
You can edit polyline (which is your road) by making sure “add polyline” is unselected and “edit selection” button is selected.
Then LMB click to one polyline point, not the line but a point. LMB press and drag the point to move it, release LMB to drop it to a new position.
If you click the line instead of a point, then the whole polyline will move, be careful on your selection.
Roads - Database Properties
Roads Database Properties
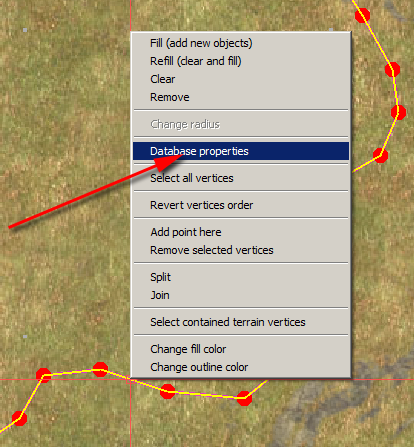
RMB your road polyline and choose “database properties”.
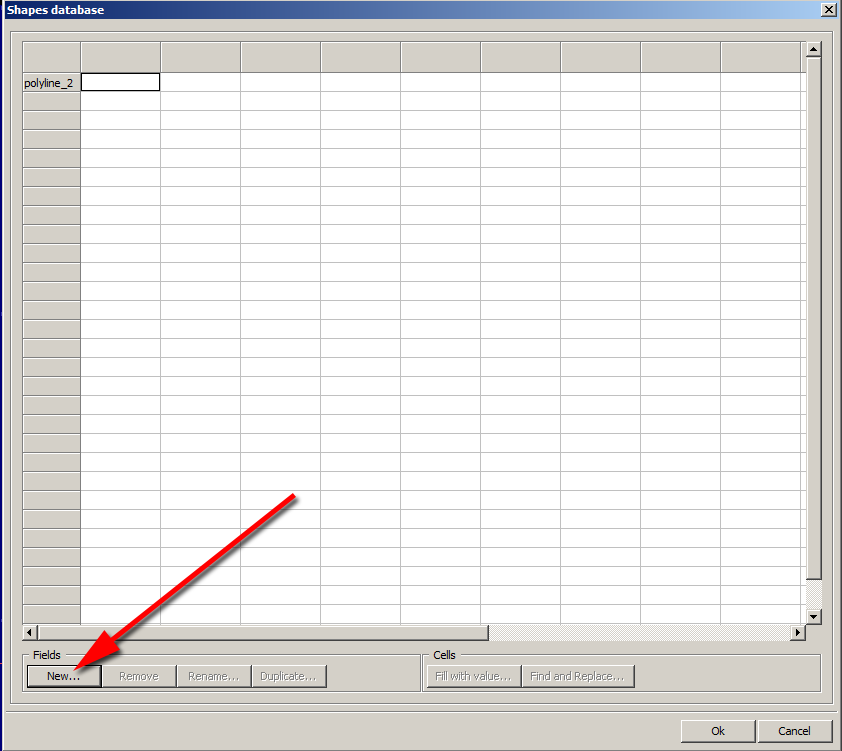
On Shapes Database dialog click “new” button.
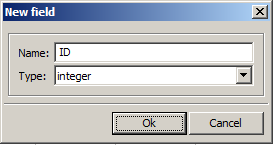
New field dialog give name: “ID” and select type: “integer”, click ok.
Click new, new field dialog give name: “ORDER” and select type: “integer”, click ok
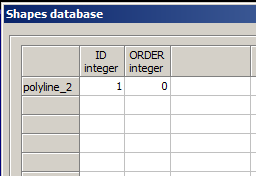
Click the ID cell, type number 1
Click the ORDER cell, type number 0
Shapes database dialog, click ok button to close
Save your project.
Roads - Export
How to export road shape files.
Create new directory into your data dir, name it “roads”, it would be:
\tut\tut_tutorial_terrain\data\roads\
- use file → export → shapes
- select “document”
- use “…” to browse into \tut\tut_tutorial_terrain\data\roads\ dir and use file name “roads.shp”, click ok
Terrain Builder should say like export shp done, click ok.
Create RoadsLib.cfg
Browse to dir, create new text file name “RoadsLib.cfg” and copy paste the following.
RoadsLib.cfg:
// 1 = Country road
// 2 = City road
// 3 = Gravel road
// 4 = Bike road
// 5 = Path
class RoadTypesLibrary
{
	class Road0001
	{
		width = 10;
		mainStrTex = "a3\roads_f\roads_ae\data\surf_roadtarmac_main_road_ca.paa"; // lowercase!
		mainTerTex = "a3\roads_f\roads_ae\data\surf_roadtarmac_main_road_end_ca.paa";
		mainMat = "a3\roads_f\roads_ae\data\surf_roadtarmac_main_road.rvmat";
		map = "road";
		AIpathOffset = 0;
	};
	class Road0002
	{
		width = 8;
		mainStrTex = "a3\roads_f\roads_ae\data\surf_roadtarmac_main_road_ca.paa"; // lowercase!
		mainTerTex = "a3\roads_f\roads_ae\data\surf_roadtarmac_main_road_end_ca.paa";
		mainMat = "a3\roads_f\roads_ae\data\surf_roadtarmac_main_road.rvmat";
		map = "road";
		AIpathOffset = 2.5;
	};
	class Road0003
	{
		width = 3;
		mainStrTex = "a3\roads_f\roads_ae\data\surf_roaddirt_road_ca.paa"; // lowercase!
		mainTerTex = "a3\roads_f\roads_ae\data\surf_roaddirt_road_end_ca.paa";
		mainMat = "a3\roads_f\roads_ae\data\surf_roaddirt_road.rvmat";
		map = "track";
		AIpathOffset = 0;
	};
	class Road0004
	{
		width = 2.5;
		mainStrTex = "a3\roads_f\roads_ae\data\surf_roadtarmac_highway_ca.paa"; // lowercase!
		mainTerTex = "a3\roads_f\roads_ae\data\surf_roadtarmac_highway_end_ca.paa";
		mainMat = "a3\roads_f\roads_ae\data\surf_roadtarmac_highway.rvmat";
		map = "main road";
		AIpathOffset = 3;
	};
	class Road0005
	{
		width = 1;
		mainStrTex = "a3\roads_f\roads_ae\data\surf_roaddirt_path_ca.paa"; // lowercase!
		mainTerTex = "a3\roads_f\roads_ae\data\surf_roaddirt_path_end_ca.paa";
		mainMat = "a3\roads_f\roads_ae\data\surf_roaddirt_path.rvmat";
		map = "track";
		AIpathOffset = 0;
	};
	class Road0006
	{
		width = 10;
		mainStrTex = "a3\roads_f\roads_ae\data\surf_roadconcrete_city_road_ca.paa"; // lowercase!
		mainTerTex = "a3\roads_f\roads_ae\data\surf_roadconcrete_city_road_end_ca.paa";
		mainMat = "a3\roads_f\roads_ae\data\surf_roadconcrete_city_road.rvmat";
		map = "track";
		AIpathOffset = 2.5;
	};
};
Configure BuldozerTools
BuldozerTools by Lappihuan was installed with Mikero Tools. If not, you need to go back to Mikero Tools homepage and download BuldozerTools from there and unpack to p:\scripts\ directory.
Browse to P:\scripts\ directory, open userconfig.sqf in text editor and replace the path to roads with this:
roadpath = "P:/tut/tut_tutorial_terrain/Data/Roads/";
If you do not configure userconfig.sqf properly the roads will not show up in buldozer.
Start buldozer and in there press 1 which is buldozertools “reload roads”, your roads should now appear.
Edit config.cpp newRoadsShape
In order to get your new roads in-game you need to edit newRoadsShape line in the config.cpp. Find the line:
newRoadsShape = "";
And edit, like this:
newRoadsShape = "\tut\tut_tutorial_terrain\data\roads\roads.shp";
Now your roads show up arma3 in-game (note: this has nothing to do with seeing roads in buldozer).
Notes
PMC ArmA 3 Ultimate Terrain Tutorial is on initial phase right now, more details will be added in the future.
You can use PMC Tactical Contact to get in touch with us, for any fixes, suggestions or questions. You should join ArmA discord chat, all you need is a browser. Check out #terrain_makers for some excellent terrain talk.


