Table of Contents
Falcon 4 About Photoshop Layers 1
Falcon 4.0 Forum, Falcon 4 Home, Falcon 4 Campaign, Falcon 4 Cockpits, Falcon 4 Database, Falcon 4 File Formats, Falcon 4 SRTM Terrain, Falcon 4 Terrain, Falcon 4 Textures, Falcon 4 Tools
by Zaggy
First part of a short series of planned articles on implementing Photoshop Layers and using them in an effective manner when dealing with complex graphics such as skinning.
Layer Basics
In the last week, since Open Skins has been up, one of the most challenging aspects of the whole skinning deal, for the newcomer, seems to be layer concept and how we use these layers to create the imagery we need.
What is a layer?
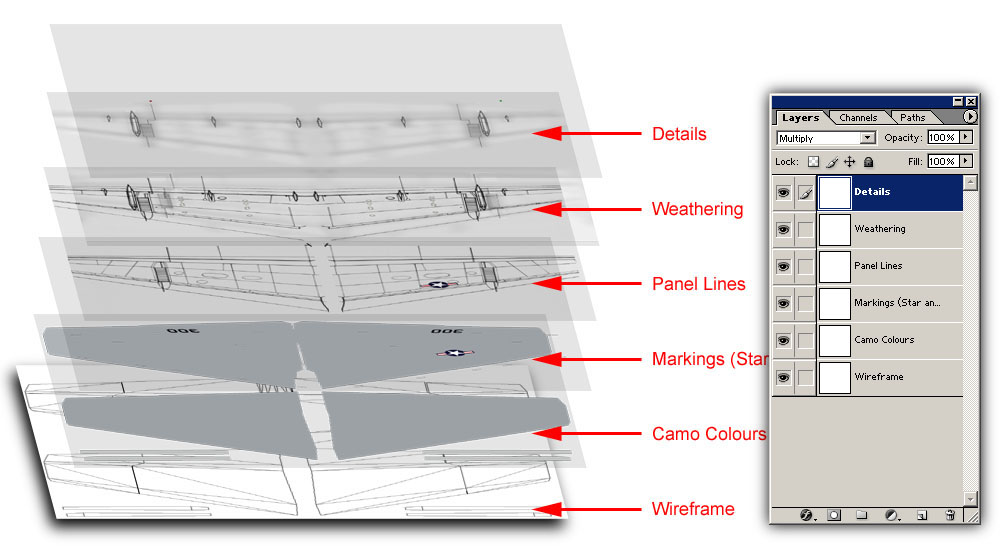
The best way to think of a layer, in this instance, is to imagine a pile of clear overhead transparencies sitting in front of you. The pile of transparencies is the file, while each individual transparency is a Layer, as shown in the image below.
Whats makes layers so useful tho, is that we can manipulate them is so many ways, but keep them completely separate from the rest of the layers in out file.
For individual layers, we are able to easily and quickly apply a filter (that may for example Blur everything on that layer, BUT ONLY that layer), change the Layer Type (for example the Multiply layer type can make white transparent and black opaque (and shades inbetween proportionatley transparent/opaque)) or duplicate an entire layer so that two copies of it exist (useful as a temporary back up, or when you whish to use the same data in two different way. One of my favourites is to copy a layer of panel lines, leaving one layer sharp, and blurring the other layer to near obscurity).
We can also change the order of these layers easily. Say we create a Unit Marking on the top layer of a file. We then think, 'Hey, this marking should be weathered like the rest of the skin'. All we need to do then is simply move this layer lower in the order of layers, until it sits ontop of the 'camouflague paint' layer, but below the 'panel lines and weathering' layer (see below image).
Sound easy so far?
The layers are controlled from a window in the Photoshop Interface, called the Layer Control or Layer Palette (see image above). Its normally positioned at the Lower Right of the screen. What it shows is the layers contained in the file, the order of the layers from top to bottom, the lowest being the bottom layer, whether or not the layer is currently visible, the Layer Type (in the example above, you can see the layer type for the layer called 'Details' is set to Multiply) for the current layer, as well as other things. This may seem quite complex at first, and it probably is, but once you understand how these layers work and how you can manipulate them, Photoshop suddenly becomes far easier to work with, and a multitude of creative options present themselves.
More to Come…
