Table of Contents
OFP OBJ2P3D
OFP Forum, OFP Home, OFP File Formats, OFP Tools, OFP Missions, OFP 3D Modeling, OFP Terrain
Operation Flashpoint (OFP) aka ArmA: Cold War Assault (CWA)
OBJ2P3D by FlipeR
This tool can import edited Wavefront OBJs in which ONLY vertice positions differ from the original. Original bis P3D format is VERY complex (with many special attributes).
Tutorial
What you need:
- Original OFP version 1.0 or newer
- 3DS Max 3.x or later (it may work with Gmax too - not tested)
- a-lone-wolfs OBJ extractor - P3D2OBJ.exe (NOT included in this package)
- The files in this package (specific .OBJ exporter/importer & OBJ2P3D.exe Compiler)
- Basic knowledge about OFP files types and working with them; basics of 3D editing (what are polygons, vertices etc)
- Alot of time and patience and love for OFP.
Getting started:
I assume that you already have extracted the model from P3D format to OBJ format! The tool required to do that is a-lone-wolfs P3D2OBJ extractor. !IMPORTANT!: You must extract the .OBJs using the “raw” format mode!
Importing the OBJ files in 3D Max:
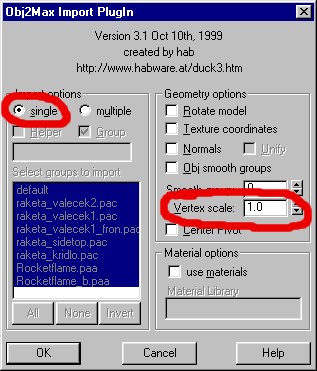
First of all, copy the two 3D Max OBJ import/export plugins into …\3DSMAX3\stdplugs\ ! When the import window appears you should cofigure it as shown on the screenshot below! Select “single” import and set the Vertex scale to 1.0 (default value is 0.001)! Then click OK.
Editing the OBJ files in 3D Max:
REMEMBER THESE 4 SIMPLE RULES:
- you can't add new vertices/polygons/textures or in any other way alter the 3D object!
- you can only MOVE the existing vertices!
- try to keep the faces (polygons) shape similar to those of the originals or heavy texture distortions will occure!
- OFP 3D models are not all the same - the Block/LOD count depends on what they represent (a weapon, a simulation model,…) Take that into account when selecting wich model to edit!
Exporting the OBJ files from 3D Max:
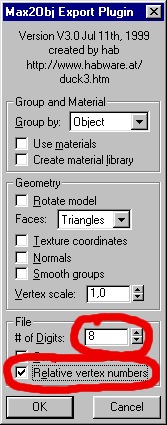
Use the OBJ exporter that comes with this package! IMPORTANT! Under the “File” options menu, the “# of digits” value must be set to “8” so that the Compiler is able to read the OBJ file and write the right values back into the P3D! You must also check “Relative vertex numbers” option! See screenshot below!
Using the Compiler (OBJ2P3D.exe):
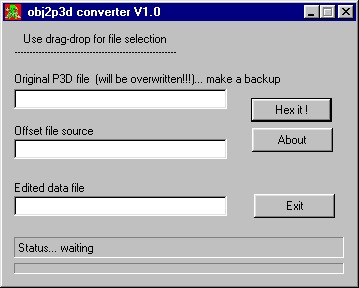
The compiler uses drag&drop technic so there should be no problem with files selection!
Assuming that you edited the first Block/LOD of the Ak_47 you need this three files:
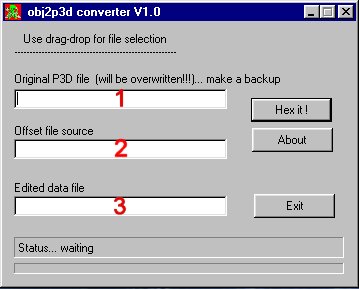
- The original ak_47_proxy.p3d file from which you extracted the .OBJ files (from the demo - MLOD format) - position: 1 on the screenshot
- The original ak_47_proxy_Block1raw.obj file (the Block/LOD must be the same as the edited model) - position: 2 on the scr.
- The edited .OBJ - edited_ak_47_proxy_Block1raw.obj file - position: 3 on the scr.
After all files are ready and in their dedicated windows, click Hex it!. Thats it! Now you have the first Block/LOD imported back into the original .P3D! Test the edited P3D! If It doesn't work you and OFP crashes, you didn't followed all the procedures or broke one of the 4 editing RULES! Read this tutorial again and then retry! Good luck…
If after this tutorial you still don't know how to use the tool and edit OFP models then I suggest you wait for the official tool!
Also note that this tutorial isn't perfect! It's in beta phase so updates are possible (if bis delays Oxygen release - hope they don't)!
Notes
This is another of those ancient tools, but still we wanted to list it. Use at your own risk.
Download OBJ2P3D.rar from OFP.Tools.2024-03-19/ torrent magnet:
magnet:?xt=urn:btih:a969461a566e82963358da612613dde4c599b822&xt=urn:btmh:1220ff0bf3f29e5ed376a29defa63efa8559cff3d01439bd1d24d19765283c6742d2&dn=OFP.Tools.2024-03-19&tr=udp%3a%2f%2ftracker.opentrackr.org%3a1337%2fannounce&tr=udp%3a%2f%2ftracker.openbittorrent.com%3a6969%2fannounce


