Road Tile Creation
by rom
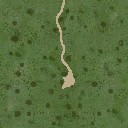
I just did a test as a small tutorial for you.
- First I resized the original PCX tile with no road with some magic tweaks to 512 (normal resizing should be fine if you just want 128 tiles) and convert it to RGB (never draw in indexed mode).
- Create a new layer and fill it with a basic road color (R:189,G:173,B:140 e.g..). The whole image gets covered by this layer now.
- Then apply a layermask to the new layer by clicking at the second icon from left at the bottom of the layer toolbox. Click the newly created layermask in the layer toolbox to select it.
- Fill the layermask with pure black by clicking with the paint bucket tool into the image after selecting the layer mask in the layer toolbox. The original grass image should be completely visible now again.
- Select the layermask (if it's not already selected) and take the paintbrush tool with pure white color, opacity of 100%, soft tip and a size a bit smaller than you want your road (I took the “Soft round 9 Pixel” one) and draw the road into your image (zooming in to 400% makes the drawing a bit easier) Just draw the basic shape rather a bit too large than too small.
- Then select pure black and the “Soft Round 21 pixels” paintbrush to smoothen the borders and erase the unwanted areas you accidentally painted. Make smooth transitions from the grass to the road. This doesn't need to be perfect since you always can adjust this after. Always take a larger brush to make smooth shapes and only go down to smaller shaped brushes if your current brush is too big for the details you want.
- Then create a basic road texture: Open a new 512×512 RGB image and fill it with the basic road color you choose for the road layer in the previous pic (R:189,G:173,B:140 e.g..).
- Create a new layer filled with white, apply the filter Noise→Add Noise with an Amount of 12%, Gaussian and Monocromatic set to the new layer and choose Multiply from the layer options in the layer toolbox (it normally shows “Normal” in the upper left of the toolbox).
- Since the noisy pixels are quite dark and rather black than the color of our road select Image→Adjust→Hue/Saturation and check the Colorize option. Then adjust the Hue to match roughly the road color (set Hue to about 40). Then adjust the Saturation and Lightness to Sat: 30 ant Light: +15. Watch how the noise in the picture blends much more with the basic color now.
- So far we have some basic grainy texture. To get a more road like texture we need some more and different patches of darker color. To do this create a new layer, fill it with pure white again and set the layer blending option to “Multiply”.
- The filter of choice is the Texture→Craquelure filter. If you just apply the filter to your 512 image the texture is a bit large in scale so we have to resize the image to 1024×1024 and then apply the Texture→Craquelure filter with Spacing: 32, Depth: 6, Brightness: 9. Then resize the image back to 512×512. (Resizing is always with “ConstrainProportions” and “Resample Image: Bicubic” to get the best results.
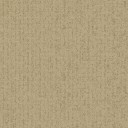
- The texture looks a bit regular so we apply another filter to it. The filter is the Distort→Ocean Ripple. The filters scale works OK with the 512, that's why we resized the image back since filter work much slower on larger images. I picked Ripple Size: 8 and Ripple Magnitude: 7 for the filter settings. After applying the filter you should have some basic road texture with small and larger quite random darker spots :)
- Now we apply the texture to our road in the grassland tile. First make a copy of the texture image by right clicking in the title bar of the image and select Duplicate. Select the duplicate, press the small arrow in the top right corner of the layer toolbox and select “flatten image” to put all the layers into a single one (we duplicated the image before to keep an editable copy of the texture to be able to tweak it if it again needs to)
- Then select all by pressing CTRL+A or choose Select→All from the menu and then hit CTRL+C to copy everything (all in the flattened image). Select the grassland image and hit CTRL-V there. You should get a new layer with your texture in it.
- Now select the layer with the layer mask (where you drew your road) and switch to the Channels toolbox (should be the tab beside the layer tab). There you should see a channel named something like Layer1 Mask. Select it and press the first icon on the bottom left of the toolbox (a single circle) to make a selection out of the layer mask.
- With the selection active switch back to the layer tab and select your texture layer. Then press the Add Layermask icon in the bottom left again (second from left) to make a layermask out of your selection.
- Now you got two layers with the same layermask applied but we only need the one with the road texture so simply delete the one with only the basic road color by dragging it into the wastebag at the bottom of the layer toolbox.
-To make the texture match the road select the smudge tool with a “Soft Round 27 pixels” tip and a pressure of about 20% (try 10% or 15% if you think 20% is too strong for your needs) and simply drag the smudge tool two times from the top to the bottom along your road. (Be sure that you selected the texture layer itself and not the applied layer mask) Now the darker areas of your texture should match the curves of the road much better. If not then smudge again a bit with less pressure, but be careful to preserve the darker spots. Go back in your history toolbox if you need to undo (don't use CTRL-Z).
- After smudging apply the sharpen filter two or more times to make the dark spots more visible again. You can repeat the smudge-sharpen procedure to get the effect you want if it doesn't appeal after the first time.
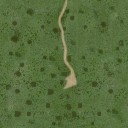
- Now the borders of the road possibly are a bit too present depending on how you drew the road to the layermask before. To adjust this select the layermask again and smoothen the borders with a soft paintbrush. Paint white with a smaller brush to enlarge the road or paint black with a bigger brush to smaller. If you made the road bigger it could be that the unsmudged texture shines through at the borders then simply smudge the road texture there again. You can avoid this by taking a bigger brush to smudge or smudge a bit more left and right of your road in the first time. The image you have now should quite look like the Finished Road Tile. Perhaps you think this is quite an effort for a 128 tile to look better and you're right, because the whole texture thing we did is merely visible in a 128 texture :) But if you compare the images at 256 or 512 the texture becomes more and more visible and adds much to the image. Also always save the PSD files of the textures you made. You can't imagine where you can need such a texture elsewhere. If it looks natural it could be used nearly everywhere by changing the color. So you see this requires not so much painting skill, only some knowledge of your filters in PS which you can get by simply experimenting allot. Just look what the filters do and try to combine different filters.


