Table of Contents
OFP Brsseb 3D Modeling Tutorial
OFP Forum, OFP Home, OFP File Formats, OFP Tools, OFP Missions, OFP 3D Modeling, OFP Terrain
Operation Flashpoint (OFP) aka ArmA: Cold War Assault (CWA)
Getting started
Oxygen 2 tutorial by Brsseb
In this pre-tutorial lesson we will go over all the stuff you need to do before you can start on lesson 1. I will guide you step-by-step from getting o2 and viewer, to making it work properly. Follow this guide and you will avoid most of the most common newbie problems.
Download o2 and viewer
First you must download Oxygen and viewer. Go to Bohemia Interactive Studio - (link dead, thanks bis!) page and download the two ZIP files. One is the program itself (its called Oxygen, or o2 for short) and the other one is the “External Viewer” (also known as Bulldozer). You dont actually need the viewer to make addons, but its almost impossible to use o2 without it. So you need both zips then (and dont extract anythink before you are told to do so).
Installing o2 and viewer
After both ZIPs are downloaded, they need to be installed properly. O2 comes with no automatic install wizard like most proper programs do, so you have to do this by hand. One VERY important thing (that almost anyone misses), is that Bulldozer (the viewer, remember) wont work unless it is installed on a “root drive” (like C:\ or F:\, and NOT C:\programfiles\bulldozer or something like that). But since the bulldozer ZIP has many files with it, few people want to mess up their drives with lots of files lying around. So we will use an old MS-DOS trick. Do this:
- Make a new folder on C:\. Name it “ofpedit”.
- Extract all files in the Bulldozer (viewer) Zip file into the new folder “C.\ofpedit”. That folder should now be filled with lots of files and folders. NB: DONT select all files in the archive and drag them out into the new folder because doing so WONT EXTRACT THE HIDDEN FOLDERS IN THE ARCHIEVE! Make sure you have no files selected and just hit the Extract button!
- In “ofpedit”-folder, make a subfolder and call it “o2”. Extract all files in the o2 ZIP into this one (C:\ofpedit\o2)
Now we have the basic files right. But DONT start anything yet because it wont work. Remember that I told you about the viewer not working unless its on a root drive? We will fix this now.
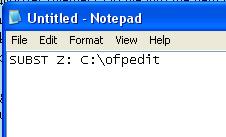
- Open notepad and write this:
- Then save it this way. Doesnt matter where you save it, but to the desktop will be a good idea.
With this file (a BAT file works like an EXE file, you click on it and it executes the commands), a “fake” Z:\ drive will appear in “My Computer” . Dont worry, your harddrive is not messed up. Its just so that windows thinks that the folder it points to is a root drive (which is really not true, its on C.\ofpedit). Think of that fake Z:\ drive as a shortcut to that folder. Also, windows loose the fake Z-drive each time windows restarts, so you need to execute this bat file each time you turn on your computer. That is why many people put this one in their “startup folder” for windows, but you`ll make that one out yourself. (NOTE: If you already have a Z:\ drive and the Z is already taken , you might wanna write another letter. Just pick one and remember that whenever you see a Z: for the rest of the lesson, write your letter instead).
- Make the above file and execute it (doubleclick on it). Check that a Z:\ drive appears in “My Computer” short time after.
Getting the right settings
Now its time to start o2. Start the main program (thats “Objektiv2Light.exe” now in your “C:\ofpedit\o2” folder). The viewer automatically starts with the program (if you have the original (not resistance CD) Operation Flashpoint CD in a CDROM drive, that is. Else you will get an error message telling you to put it in. You cant use the viewer without an original OFP CD). UPDATE: The newest version of the viewer dont need the CD in the drive to start up, but still looks into the windows registry to ensure you got a valid copy of OFP installed.
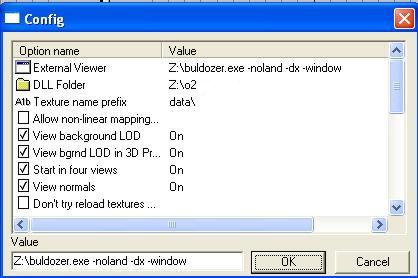
The first time you start, you will most likely get some error messages of some sort, the viewer will look weird or something like that. Thats ok for now. Just close the viewer window if it keep causing trouble and find the “Options”-dialog on the “File” menu in the main editor window. This lists all of the settings. To change a value, click on each list item and change it using the edit box below. Its just the 6-8 topmost settings that really needs changing, so dont bother with the once in the bottom. Here is what it should look like. Make sure you get this right:
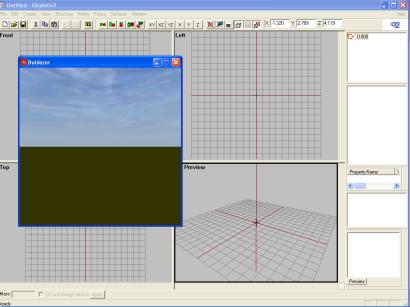
When all is set, hit ok and restart the program (closing o2light also closes the viewer window. Starting o2light starts the viewer).
NB: Some people didnt get o2 to load any textues with these settings. Nothing seemed to happen when they loaded a texture (just said “Texture loaded: NULL” in the active viewport, no errormessage popupwindow). To counter this, try changing the DLL folder path from Z:\o2 to the actual path C:\ofpedit\o2.
Ready to go, sir!
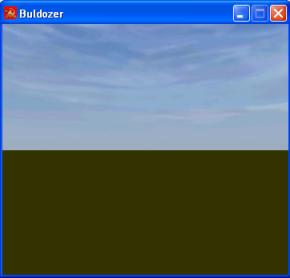
If all works out well, the viewer should display this picture when done loading just after startup:
If you get an error message or it displays a open sea instead, something went wrong. Make sure you have followed the EXACT instructions above. Also check out the hint about 3d card trouble at the end of this page. Try the official forums (see link page), they have a section for o2 bugs and stuff. You can also try mailing me and hopefully I will have the answer for you (brsseb@hotmail.com).
Well, if you have done all the above and no error messages, you are fit for fight and may start with the first tutorial, “Lesson 1 - Making your first addon”.
If you got trouble...
To aviod some common 3d display settings for Bulldozer, it it can be helpfull to use the same 3d settings for the viewer as you use for the game. That way you will kill off most of the way-too-common “3dglide.dll driver error”-stuff. Do this:
- Go to your operation flashpoint folder and find the file “flashpoint.cfg”. Copy this file (Ctrl+C).
- Go to your C:\ofpedit directory (or Z:\ for that sake, same dir remember?) and replace the configfile already there with your own (Cltr+V and “yes” to overwrite).
This should help if you have 3d problems with Bulldozer.
NOTE: Do NOT overwrite the default flashpoint.cfg where bulldozer is installed if you are NOT experiencing problems. I have had reports of buldozer not working when doing this, and where the default settings were better. If you want to try this, always backup your original buldozer cfg file. NOTE: If you have displayproblems when running OFP or it wont start at all you most likely wont get Buldozer working properly. This whole tutorial assume you have a working copy of OFP installed. Update your drivers/hardware to fix this. I cant help you getting buldozer to work if your original ofp wont work. Then its a hardware issue and only BIS is qualified to help you with that.
Notes
This tutorial was written by Brsseb in ofp.gamepark.cz/_hosted/brsseb/, it was posted here with his permissions, thank you Brsseb!


